-
Youtube 만들기 - 10) 댓글 기능 만들기NODE.JS 2021. 5. 14. 23:33
이번에는 댓글을 달 수 있는 기능을 만들 것이다.
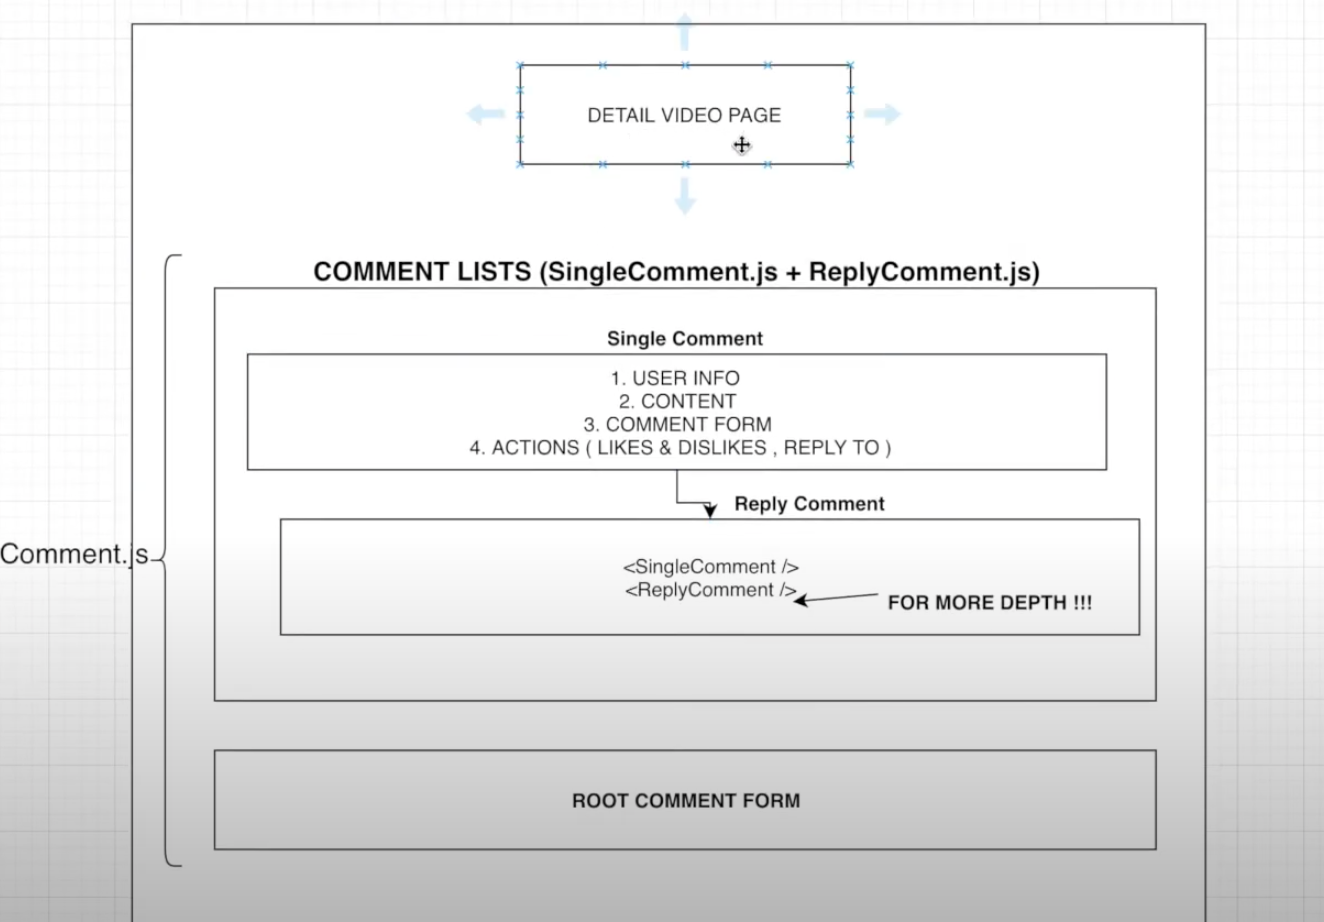
순서 전체 디테일 페이지에서 커멘트 리스트가 있다.
Root comment Form 은 원래 댓글을 생성하는 창이고,
single comment 는 유저 정보와 컨텐트 , 커멘트 폼과 액션이 있는데 이것은 하나만 생성되어있는 댓글에 답댓을 다는 형식이다.
그다음 reply comment는 이미 생성된 댓글의 댓글에 다시 답댓을 다는 form 이다.
여기서 replycomment 안에 다시 singlecomment form- reply comment form 형식을 넣어서
무한정으로 답댓을 다는 것이 가능하게끔 설정해둔 것이다.
댓글의 구조 
single comment form 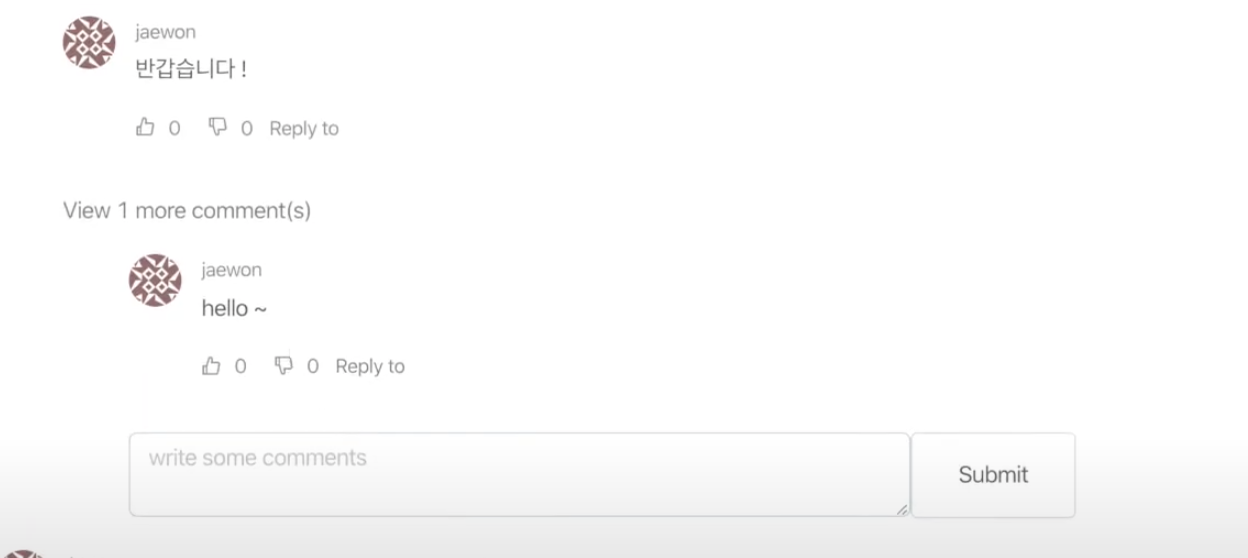
reply comment form 댓글의 댓글도 달 수 있다.

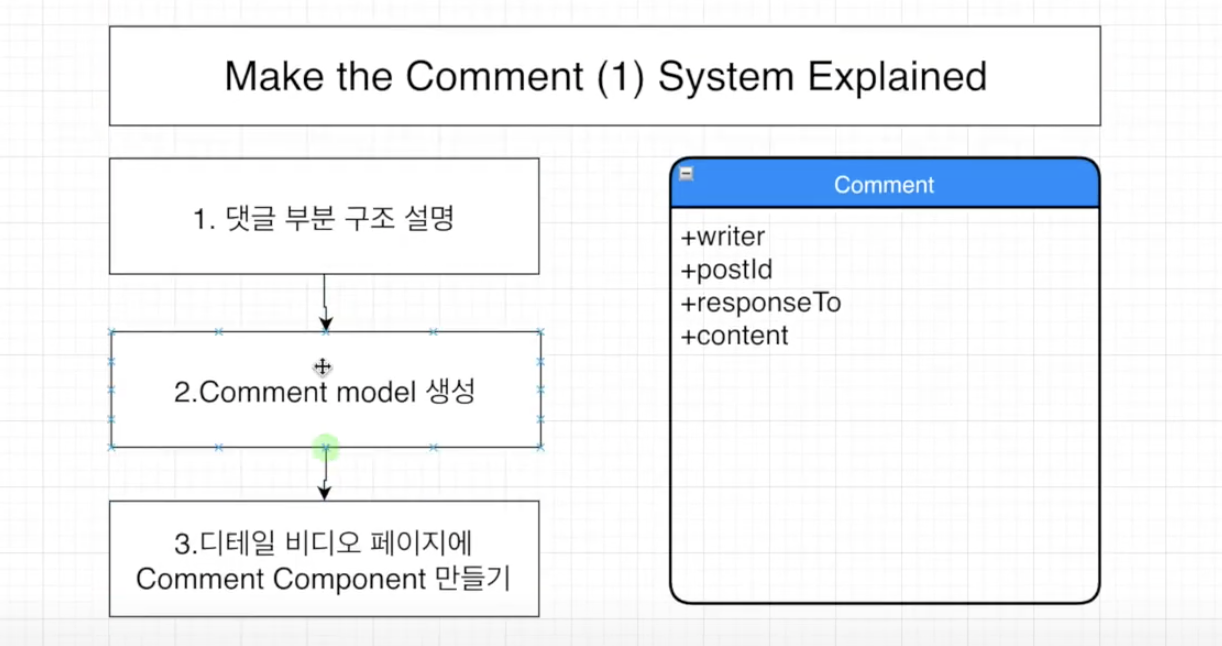
만드려는 이미지 , root comment form 우선 comment form을 생성해보자.
server>models>Comment.js를 생성한다.
const mongoose = require('mongoose');
const Schema = mongoose.Schema;

const CommentSchema = mongoose.Schema({
    writer:{
        type:Schema.Types.ObjectId,
        ref:'User'
    },
    postId:{
        type: Schema.Types.ObjectId,
        ref:'Video'
    },
    responseTo:{
        type:Schema.Types.ObjectId,
        ref:'User'
    },
    content:{
        type: String
    }
}, {timestamps:true})//업데이트 시간 표시

const Comment = mongoose.model('Comment', CommentSchema)
module.exports = {Comment }
그다음 커멘트 부분을 만들 것인데,
저번에 subscribe 기능을 따로 만든 것처럼 비디오 디테일 페이지에
너무 많은 정보가 들어가면 길어질 수 있으니,
따로 comment 파일을 만들어서 기능을 구현하자.
비디오 디테일 페이지를 다음과 같이 추가해주고,
import Comment from './Sections/Comment';

                    {/* Comments */}
                    <Comment />
src>components>views>sections>Comment.js파일을 추가해준다.
import React from 'react'

function Comment() {
    return (
        <div>
            Comment
        </div>
    )
}

export default Comment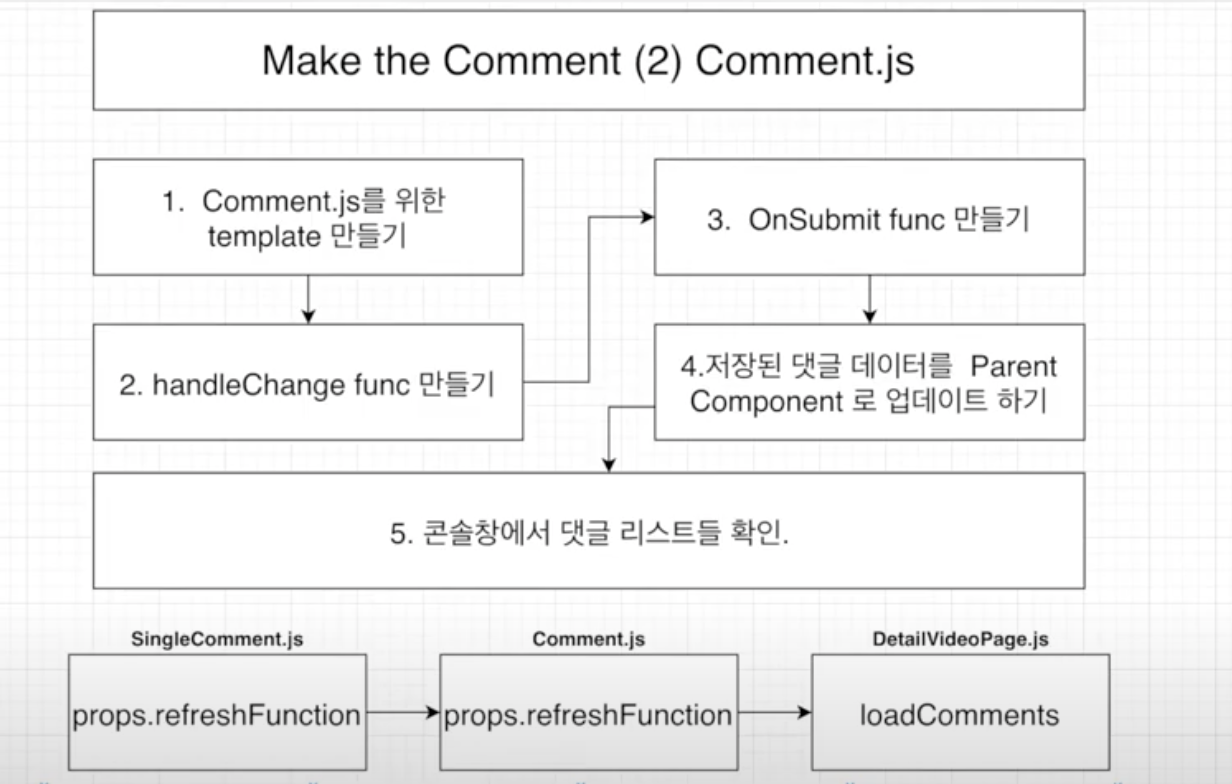
순서 비디오 디테일에서 커맨트 부분을 분리해서 작성하긴 하지만,
커멘트를 업데이트 하면, 생성된 커멘트를 다시 비디오 디테일 페이지에서 setState를 이용해서 업데이트 해줘야 한다.
우선 comment.js의 템플릿을 먼저 만들어보자.
import React from 'react'

function Comment() {
    return (
        <div>
            <br />
            <p>Replies</p>
            <hr />

            {/* Comment Lists */}


            {/* Root Comment Form */}


            <form style = {{display:'flex'}} onSubmit>
                <textarea
                    style={{width:'100%', borderRadius:'5px'}}
                    onChange
                    value
                    placeholder = "코멘트를 작성해주세요"
                />
                <br/>
                <button style={{width:'20%', height:'52px'}} onClick>Submit</button>

            </form>

        </div>
    )
}

export default Comment
현재 상태 handleClick 기능을 만들어서 타자치는 대로 화면에 보여주도록 하자.
import React ,{useState} from 'react'

function Comment() {
    const [commentValue, setcommentValue] = useState("")

    const handleClick = (event) =>{
        setcommentValue(event.currentTarget.value)
    }


   //...
                    value = {commentValue}

export default Comment
이번에는 OnSubmit 기능을 만들어서 submit 버튼을 눌렀을 때 리플이 달리도록 해보자.
비디오 디테일페이지에서 videoId를 props로 보내준다.
                    {/* Comments */}
                    <Comment postId = {videoId}/>
import Axios from 'axios' import e from 'express' import React ,{useState} from 'react' import {useSelector} from 'react-redux'; function Comment(props) { const user = useSelector(state => state.user);//리덕스 이용해서 writer 정보 가져올 것이다. const videoId = props.postId //비디오 디테일에서 보낸 것을 가지고 오자. const [commentValue, setcommentValue] = useState("") const handleClick = (event) =>{ setcommentValue(event.currentTarget.value) } const onSubmit = (event) =>{ //아무것도 누르지 않은 상태에서 submit 눌렀을 때 페이지 리프레시 되지 않게 먼저 막아주자 event.preventDefault(); //입력한 데이터를 db에 보내자. const variables = { content: commentValue, writer: user.userData._id, //로컬저장소말고 redux를 이용해서 가져오자. (useSelector이용해서 state에 담겨져 있는거 가져온다. ) //prop으로 넣어서(비디오 디테일 에서)가져올 수도 있고, 비디오 아이디url에서 가져와서 할 수도 있다. 디테일 페이지에서 가져오자. postId: videoId } Axios.post('/api/comments/saveComment', variables) .then(response =>{ if(response.data.success){ }else{ alert('커멘트를 저장하지 못했습니다.') } }) }axios를 만들었으니, route도 만들어주자.
server>routes>comments.js파일을 만들어준다.
우선 index.js파일에 추가해준다.
app.use('/api/comments', require('./routes/comments'));const express = require('express'); const router = express.Router(); const {Comment } = require("../models/Comment"); const { route } = require('./users'); //================================= // Comments //================================= route.post("/saveComment", (req, res)=>{ const comment = new Comment(req.body)//클라이언트에서 넘어온 커멘트 정보 생성 //comment를 mongodb에 저장 comment.save((err, comment)=>{ if(err) return res.json({success:false, err}) //writer의 모든 정보를 가져오기 위해서 comment 모델을 가져와서 찾아버리자.(save했을 때에는 populate을 쓸 수 없어서 정보를 가져올 수 없다. ) comment.find({'_id':comment._id}) .populate('writer') .exec((err, result)=>{ if(err) return res.json({success:false, err}) res.status(200).json({success:true, result}) }) }) }); module.exports = router;저장된 댓글들을 부모에게 update해주자.
여기서 업데이트하는 방법은 업데이트하는 함수를 videodetailpage에 만들고, 이를 props로 자식들에게 전해주면서
만약 커멘트를 submit하는데 성공한다면
부모의 refreshFunction을 이용해서 새로운comment를 추가해서 다시 알려주는 식으로 진행된다.
우선 detial페이지에서 함수를 만들고 props로 전해준다.
    const refreshFunction = (newComment) =>{
        setComments(Comments.concat(newComment))
    }


                    {/* Comments */}
                    <Comment refreshFunction = {refreshFunction} commentLists = {Comments} postId = {videoId}/>
comments.js는 submit이 실행되면 이 함수도 실행한다.
    const onSubmit = (event) =>{
        //아무것도 누르지 않은 상태에서 submit 눌렀을 때 페이지 리프레시 되지 않게 먼저 막아주자
        event.preventDefault();

        //입력한 데이터를 db에 보내자.

        const variables = {
            content: commentValue,
            writer: user.userData._id, //로컬저장소말고 redux를 이용해서 가져오자. (useSelector이용해서 state에 담겨져 있는거 가져온다. )
            //prop으로 넣어서(비디오 디테일 에서)가져올 수도 있고, 비디오 아이디url에서 가져와서 할 수도 있다. 디테일 페이지에서 가져오자.
            postId: videoId
        }
        Axios.post('/api/comments/saveComment', variables)
            .then(response =>{
                if(response.data.success){
                     props.refreshFunction(response.data.result)
                     setcommentValue("")//보냈으면 비워준다.

                }else{
                    alert('커멘트를 저장하지 못했습니다.')
                }
            })

    }
이번에는 한 부분의 comment 부분 을 만들자.
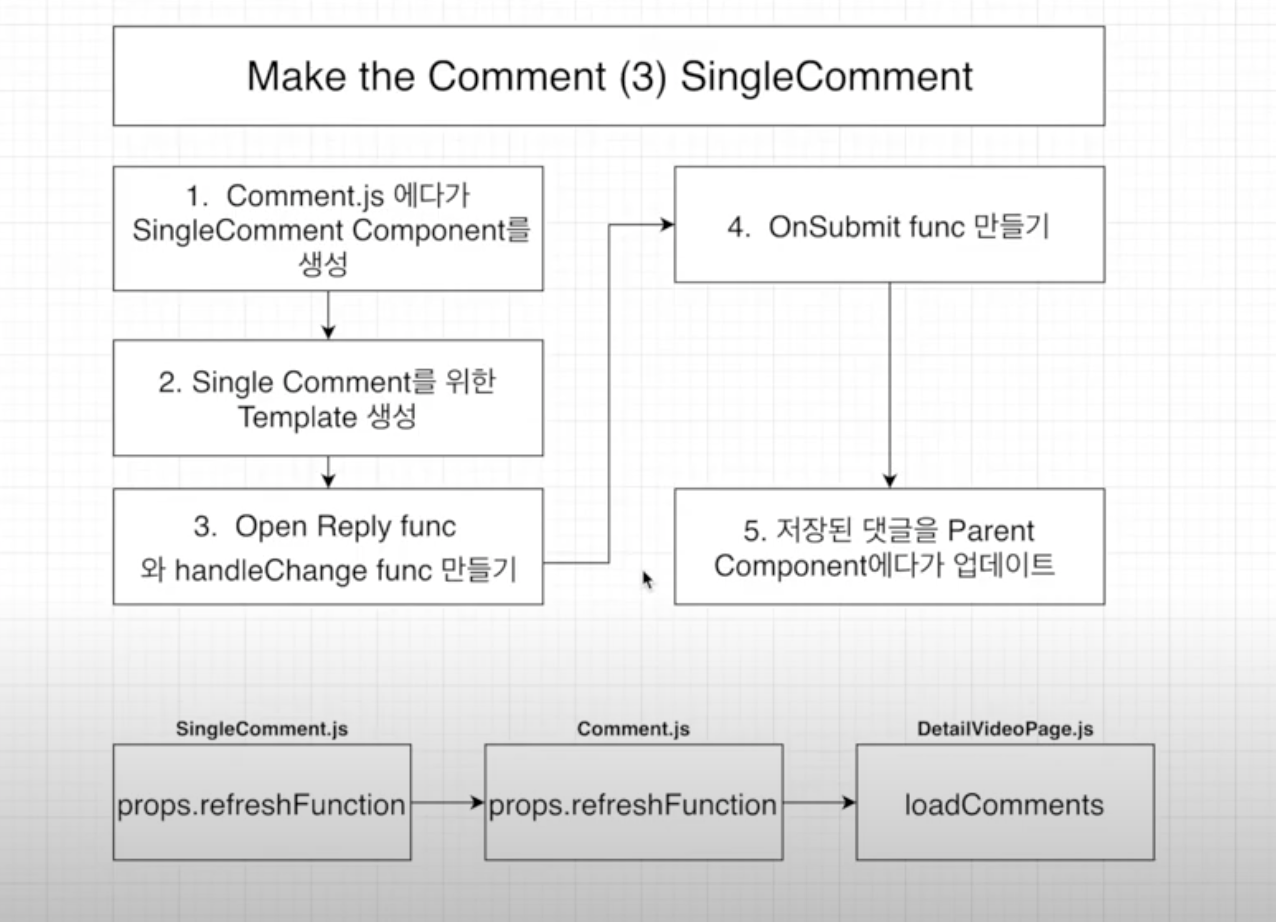
순서 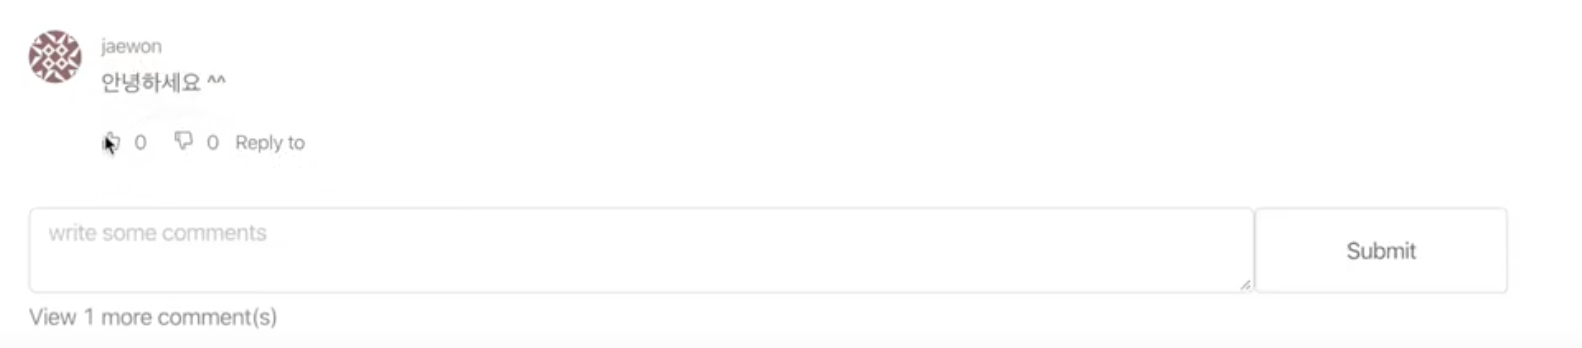
이러한 형태 components>views>VideoDetailPage>Sections>SingleComment.js파일을 만들어준다.
import React from 'react'

function SingleComment() {
    return (
        <div>
            SingleComment
        </div>
    )
}

export default SingleComment
Comments.js파일에 SingleComment component를 넣어준다.
import SingleComment from './SingleComment';

            {/* Comment Lists */}

            <SingleComment />
antd 디자인을 이용해서 form 을 만들어준다.
import React from 'react'
import {Comment, Avatar, Button, Input} from 'antd';

const {TextArea} = Input;

function SingleComment() {
    return (
        <div>
            <Comment
                actions
                author
                avatar={<Avatar src alt />}
                content
            />

            <form style = {{display:'flex'}} onSubmit >
                <textarea
                    style={{width:'100%', borderRadius:'5px'}}
                    onChange
                    value
                    placeholder = "코멘트를 작성해주세요"
                />
                <br/>
                <button style={{width:'20%', height:'52px'}} onClick>Submit</button>

            </form>
        </div>
    )
}

export default SingleComment
reply to actions를 만드는데 reply to 를 누르면 댓글 form이 나오고 다시한번 누르면 사라지는 것을 구현할 것이다.
import React, {useState} from 'react'
import {Comment, Avatar, Button, Input} from 'antd';

const {TextArea} = Input;

function SingleComment() {

    const [OpenReply, setOpenReply] = useState(false)

    const onClickReplyOpen = () =>{
    	//한번 누르면 원래 상태와 반대로 되도록 설정
        setOpenReply(!OpenReply)
    }

    const actions = [
        <span onClick = {onClickReplyOpen} key = "comment-basic-reply-to">Reply to</span>
    ]

    return (
        <div>
            <Comment
                actions = {actions}
                author
                avatar={<Avatar src alt />}
                content
            />

			//OpenReply일 때만 댓글창이 보이도록 설정
            {OpenReply &&
                        <form style = {{display:'flex'}} onSubmit >
                        <textarea
                            style={{width:'100%', borderRadius:'5px'}}
                            onChange
                            value
                            placeholder = "코멘트를 작성해주세요"
                        />
                        <br/>
                        <button style={{width:'20%', height:'52px'}} onClick>Submit</button>

                    </form>
            }

        </div>
    )
}

export default SingleComment
handleChange 기능도 구현한다.
import React, {useState} from 'react'
import {Comment, Avatar, Button, Input} from 'antd';

const {TextArea} = Input;

function SingleComment() {

    const [CommentValue, setCommentValue] = useState(initialState)


    const onHandleChange = (event) =>{
        setCommentValue(event.currentTarget.value);
    }


                            onChange  = {onHandleChange}
                            value = {CommentValue}
onSubmit function도 구현한다.
여기서도 저번과 같이 postId를 Comments.js(부모)에서 가져와서 넣어준다.
<SingleComment postId = {videoId}/>여기서 모든 comment들의 정보를 다 가지고 와야하는데 이건 비디오 디테일 페이지에서 comment를 가져와야 한다.
가져와서 prop으로 보내주자.
    const [Comments, setComments] = useState([])


            Axios.post('/api/comments/getComment', variable)
            .then(response=>{
                if(response.data.success){
                    setComments(response.data.Comments)

                }else{
                    alert('코멘트 정보를 가져오는 것을 실패했습니다.')
                }
            })


                    {/* Comments */}
                    <Comment commentLists = {Comments} postId = {videoId}/>
axios했으니까 route추가
route.post("/getComment", (req, res)=>{
    Comment.find({"postId":req.body.videoId})
        .populate('writer')
        .exec((err, comments)=>{
            if(err)return res.status(400).send(err)
            res.status(200).json({success:true, comments})
        })
});
Comments는 받은 댓글들을 map을 이용해서 SingleComment 에 넣어준다.
            {/* Comment Lists */}


            {props.commentLists && props.commentLists.map((commnet, index)=>{
                <SingleComment comment ={comment} postId = {videoId}/>

            })}
singleComment는 받은 댓글들을 표시해준다.
        <div>
            <Comment
                actions = {actions}
                author = {props.comment.writer.name}
                avatar={<Avatar src = {props.comment.writer.image} alt />}
                content = {<p> {props.comment.content}</p>}
            />
그런데 여기서 모든댓글들을 다 보여주는 것이 아닌, responseTo가없는 애들만(루트댓글들) 보여주도록 하고 싶다.
comment.js를 다음과 같이 수정해준다.
            {/* Comment Lists */}


            {props.commentLists && props.commentLists.map((commnet, index)=>{
                (!comment.responseTo && <SingleComment comment ={comment} postId = {videoId}/>)
            })}
댓글들 까지 가져왔으니 responseTo를 가져올 수 있어서 onSubmit 기능을 완성할 수 있다.
import React, {useState} from 'react'
import {Comment, Avatar, Button, Input} from 'antd';
import Axios from 'axios';
import {useSelector} from 'react-redux';


    const user = useSelector(state => state.user);//리덕스 이용해서 writer 정보 가져올 것이다.


    const onSubmit = (event) =>{
        event.preventDefault();

        //저번에 onsubmit과 비슷하다. 누구한테 다는 지에대해서만 정보가 추가된다. (response to)
        const variables = {
            content: CommnetValue,
            writer: user.userData._id, //로컬저장소말고 redux를 이용해서 가져오자. (useSelector이용해서 state에 담겨져 있는거 가져온다. )
            //prop으로 넣어서(비디오 디테일 에서)가져올 수도 있고, 비디오 아이디url에서 가져와서 할 수도 있다. 디테일 페이지에서 가져오자.
            postId: props.postId,
            responseTo: props.comment_id
        }

        Axios.post('/api/comments/saveComment', variables)
            .then(response =>{
                if(response.data.success){

                }else{
                    alert('커멘트를 저장하지 못했습니다.')
                }
            })


    }

    return (
        <div>
            <Comment
                actions = {actions}
                author = {props.comment.writer.name}
                avatar={<Avatar src = {props.comment.writer.image} alt />}
                content = {<p> {props.comment.content}</p>}
            />

            {OpenReply &&
                        <form style = {{display:'flex'}} onSubmit = {onSubmit} >
                        <textarea
                            style={{width:'100%', borderRadius:'5px'}}
                            onChange  = {onHandleChange}
                            value = {CommentValue}
                            placeholder = "코멘트를 작성해주세요"
                        />
                        <br/>
                        <button style={{width:'20%', height:'52px'}} onClick = {onSubmit}>Submit</button>

                    </form>
            }

        </div>
    )
}

export default SingleComment
single comment도 refresh함수를 이용해서 새로 업데이트된 댓글을 부모에게 알려주자.
prop으로 refresh함수를 보내주고,
            {/* Comment Lists */}


            {props.commentLists && props.commentLists.map((commnet, index)=>{
                (!comment.responseTo && <SingleComment refreshFunction = {props.refreshFunction}comment ={comment} postId = {videoId}/>)
            })}
singlecomment에서 이를 받아서 onsubmit성공하면 실행한다.
    const onSubmit = (event) =>{
        event.preventDefault();

        //저번에 onsubmit과 비슷하다. 누구한테 다는 지에대해서만 정보가 추가된다. (response to)
        const variables = {
            content: CommnetValue,
            writer: user.userData._id, //로컬저장소말고 redux를 이용해서 가져오자. (useSelector이용해서 state에 담겨져 있는거 가져온다. )
            //prop으로 넣어서(비디오 디테일 에서)가져올 수도 있고, 비디오 아이디url에서 가져와서 할 수도 있다. 디테일 페이지에서 가져오자.
            postId: props.postId,
            responseTo: props.comment_id
        }

        Axios.post('/api/comments/saveComment', variables)
            .then(response =>{
                if(response.data.success){
                    props.refreshFunction(response.data.result)
                    setcommentValue("")//보냈으면 비워준다.

                }else{
                    alert('커멘트를 저장하지 못했습니다.')
                }
            })


    }
이제 replycomment를 만들어서 comment + singlecomment의 기능이 무한정으로 늘어날 수 있도록
복합 댓글들을 만들어보자.
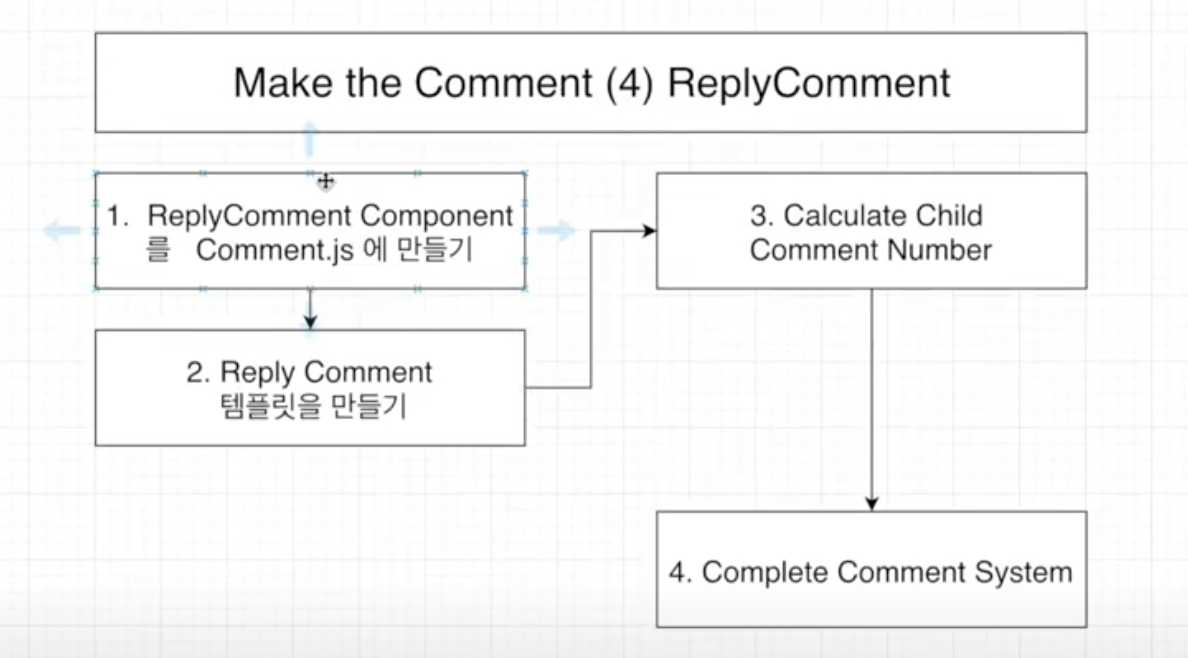
순서 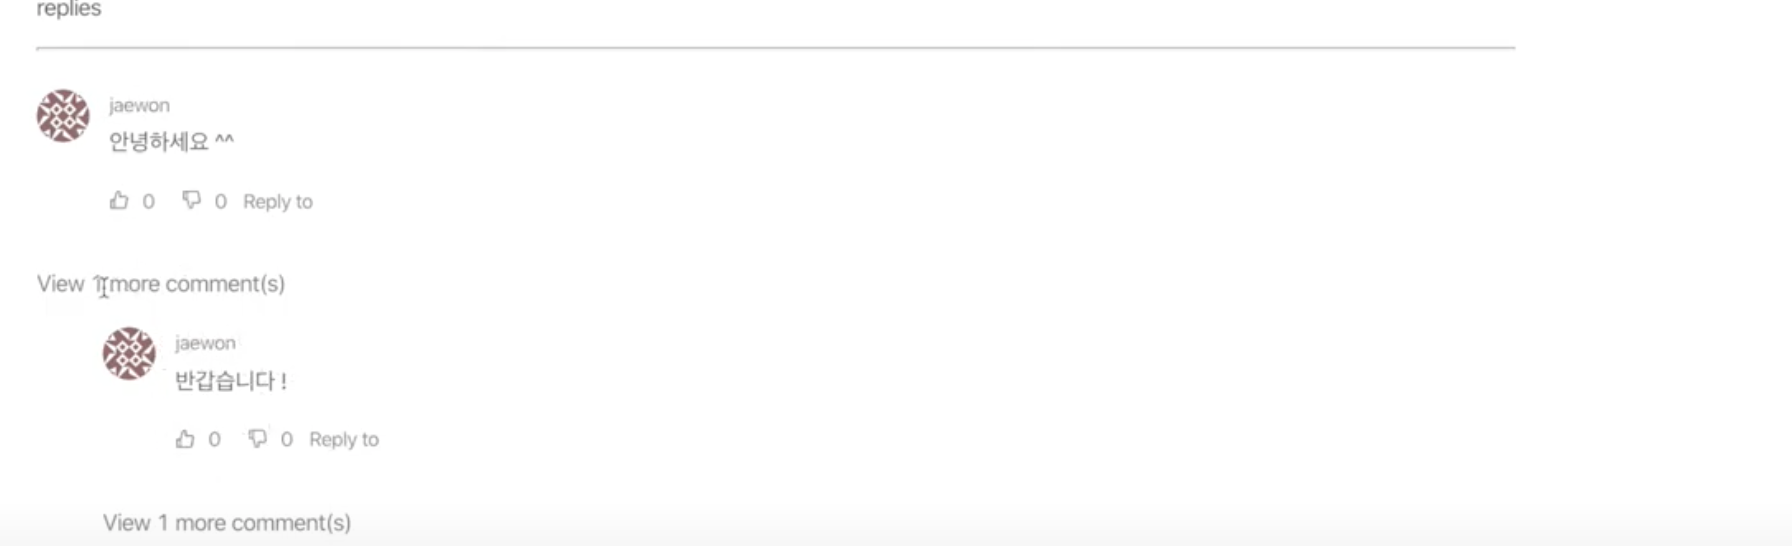
reply comment 형태 comments.js에 replyComment 파트를 넣어준다.
import ReplyComment from './ReplyComment';


			{/* Comment Lists */}


            {props.commentLists && props.commentLists.map((commnet, index)=>{
                (!comment.responseTo &&
                    <React.Fragment>
                    <SingleComment refreshFunction = {props.refreshFunction}comment ={comment} postId = {videoId}/>
                    <ReplyComment />
                    </React.Fragment>
                    )
            })}
sections>ReplyComment.js파일을 만들어준다.
import React from 'react'

function ReplyComment() {
    return (
        <div>
            ReplyComment
        </div>
    )
}

export default ReplyComment
템플릿은 싱글 커멘트와 같은 템플릿을 가진다. (view more Comments를 나타내는 부분제외)
comment는 replycomment에게 모든 커멘트를 보내준다.
            {/* Comment Lists */}


            {props.commentLists && props.commentLists.map((commnet, index)=>{
                (!comment.responseTo &&
                    <React.Fragment>
                    <SingleComment refreshFunction = {props.refreshFunction}comment ={comment} postId = {videoId}/>
                    <ReplyComment commentLists = {props.commentLists}/>
                    </React.Fragment>
                    )
            })}
이것을 받은 replyComment는 커멘트의 responseTo와 부모 커멘트의 아이디가 같은 경우에 Comment.js의 singleComment, replyComment와 같은 형태를 띄게 된다.
첫째로, responseTo가 없는 첫번째 댓글은 고려대상이 아니라서 skip된다.
두번째, singleComment에서 responseTo와 부모 commentid가 같은 것만 렌더링이 된다.
그리고 다시 replycomment에 가서 두번째 댓글들에 있는 것의 아이디와 세번째 댓글의 responseTo가 같으면 렌더링 된다.
부모의 아이디를 보내주기 위해서 comment.js에서 props를 보내준다.
비디오 id 도 보내주자.
<ReplyComment parentCommentId = {comment._id} postId ={videoId} commentLists = {props.commentLists}/>import React from 'react' import SingleComment from './SingleComment'; function ReplyComment(props) { const renderReplyComment = (parentCommentId) =>{ props.commentLists.map((comment, index)=>{ <React.Fragment> { comment.responseTo === parentCommentId && <div> <SingleComment refreshFunction = {props.refreshFunction}comment ={comment} postId = {props.postId}/> <ReplyComment commentLists = {props.commentLists} postId = {props.postId} parentCommentId = {comment._id}/> </div> } </React.Fragment> }) } return ( <div> <p style={{fontSize:'14px', margin:0, color:'gray'}}onClick> View more Comments </p> {renderReplyComment(props.parentCommentId)} </div> ) } export default ReplyCommentview수도 나올 수 있도록 해보자.
import React ,{useEffect, useState} from 'react'
import SingleComment from './SingleComment';


function ReplyComment(props) {

    const [ChildCommentNumber, setChildCommentNumber] = useState(initialState)
    useEffect(() => {

        let commentNumber = 0;

        props.commentLists.map((comment, index)=>{
            if(comment.responseTo===props.parentCommentId){
                commentNumber+=1;
            }
        })

        setChildCommentNumber(commentNumber);
    }, [])


        return (

        <div>
            {ChildCommentNumber >0 &&
                <p style={{fontSize:'14px', margin:0, color:'gray'}}onClick>
                    View {ChildCommentNumber} more Comment(s)
                </p>
            }

            {renderReplyComment(props.parentCommentId)}

        </div>
    )
}
onclick했을때 변화가 있도록 해보자.
    const [OpenReplyComments, setOpenReplyComments] = useState(initialState)


    const onHandleChange=() =>{
        setOpenReplyComments(!OpenReplyComments)
    }

    return (

        <div>
            {ChildCommentNumber >0 &&
                <p style={{fontSize:'14px', margin:0, color:'gray'}}onClick={onHandleChange}>
                    View {ChildCommentNumber} more Comment(s)
                </p>
            }


            {OpenReplyComments &&
                renderReplyComment(props.parentCommentId)
            }


        </div>
    )
댓글창의 스타일링을 준다.
            <React.Fragment>
                {
                    comment.responseTo === parentCommentId &&
                    <div style={{ width:'80%', marginLeft:'40px'}}>
                        <SingleComment refreshFunction = {props.refreshFunction}comment ={comment} postId = {props.postId}/>
                        <ReplyComment commentLists = {props.commentLists} postId = {props.postId} parentCommentId = {comment._id}/>
                    </div>
                }
            </React.Fragment>
여기서 답글에 대댓글을 달면 refreshFunction오류가 생기는데, 그 이유는 replyComment에도
refreshFunction이 prop으로 들어가야 하기 때문이다.
comment.js를 다음과 같이 변경해주자 .
                    <React.Fragment>
                    <SingleComment refreshFunction = {props.refreshFunction}comment ={comment} postId = {videoId}/>
                    <ReplyComment refreshFunction = {props.refreshFunction} parentCommentId = {comment._id} postId = {videoId} commentLists = {props.commentLists}/>
                    </React.Fragment>
ReplyComment.js도 다음과 같이 변경한다.
    const renderReplyComment = (parentCommentId) =>{
        props.commentLists.map((comment, index)=>{

            <React.Fragment>
                {
                    comment.responseTo === parentCommentId &&
                    <div style={{ width:'80%', marginLeft:'40px'}}>
                        <SingleComment refreshFunction = {props.refreshFunction}comment ={comment} postId = {props.postId}/>
                        <ReplyComment refreshFunction = {props.refreshFunction} commentLists = {props.commentLists} postId = {props.postId} parentCommentId = {comment._id}/>
                    </div>
                }
            </React.Fragment>
        })
    }
지금은 페이지 리프레시를 해야지만 대댓글달린 것이 보인다.
이를 수정해보자.
ReplyComment부분을 다음과 같이 수정한다.
    useEffect(() => {

        let commentNumber = 0;

        props.commentLists.map((comment, index)=>{
            if(comment.responseTo===props.parentCommentId){
                commentNumber+=1;
            }
        })

        setChildCommentNumber(commentNumber);
    }, [props.commentLists])//숫자가 바뀔때마다 이부분이 실행이 되어야 아래 0이상의 코멘트가 있을때 보이는 것이 실행이 된다. (부모로 오는 commentLists가 변경이 될때마다 전체부분을 실행하라는 의미)
또, 대댓글을 입력한 후에는 대댓글 입력창이 사라지도록 설정해준다.
singleCommnet.js를 다음과 같이 수정해준다.
Axios.post('/api/comments/saveComment', variables) .then(response =>{ if(response.data.success){ props.refreshFunction(response.data.result) setcommentValue("")//보냈으면 비워준다. setOpenReply(false) }else{ alert('커멘트를 저장하지 못했습니다.') } }) }'NODE.JS' 카테고리의 다른 글
ChatBot 만들기 - 1)dialogflow setting (0) 2021.05.15 Youtube 만들기 - 11) 좋아요, 싫어요 기능 만들기 (0) 2021.05.15 Youtube 만들기 - 9) 구독 비디오 페이지 만들기 (0) 2021.05.14 Youtube 만들기 - 8) 구독기능 만들기 (0) 2021.05.14 Youtube 만들기 - 7) 비디오 디테일 페이지 만들기 (0) 2021.05.14