-
OnlineShop 만들기 - 2) 업로드페이지에 dropzone기능과 ondelete 기능 만들기NODE.JS 2021. 5. 15. 15:42
업로드 페이지에 상품이미지를 끌어와서 등록하는 dropzone기능을 만들 것이다.
업로드는 여러개의 이미지를 한번에 업로드하는 것이 가능하도록 구현한다.
또한 올라온 이미지를 한번더 클릭하면 이미지가 목록에서 제외되도록 구현한다.
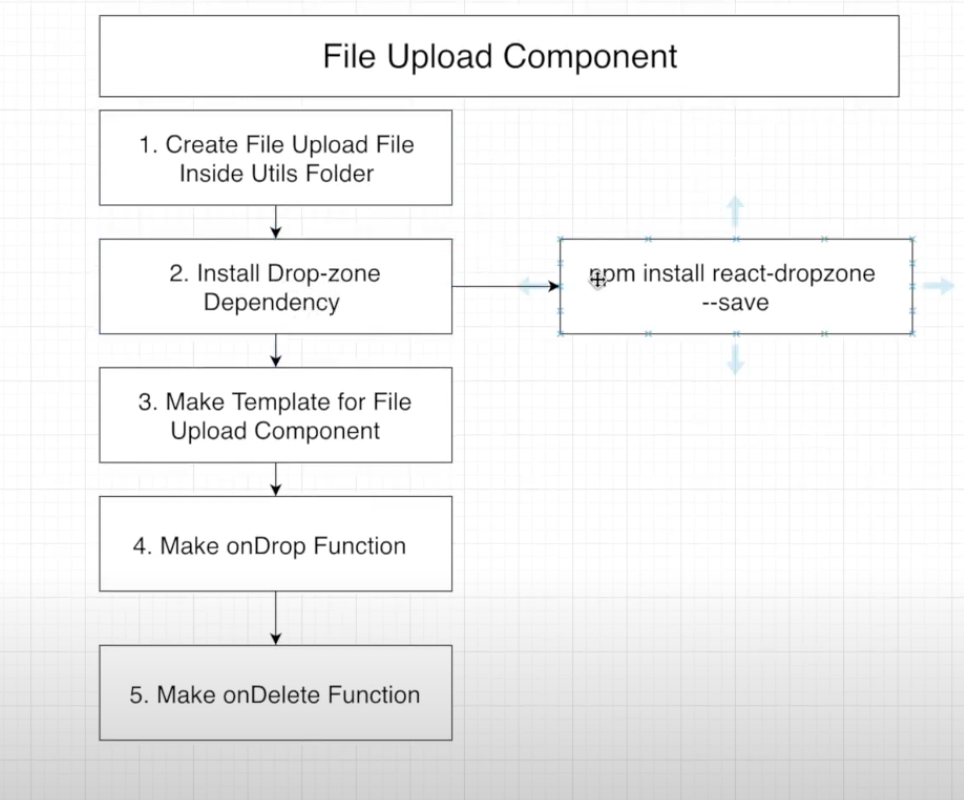
순서 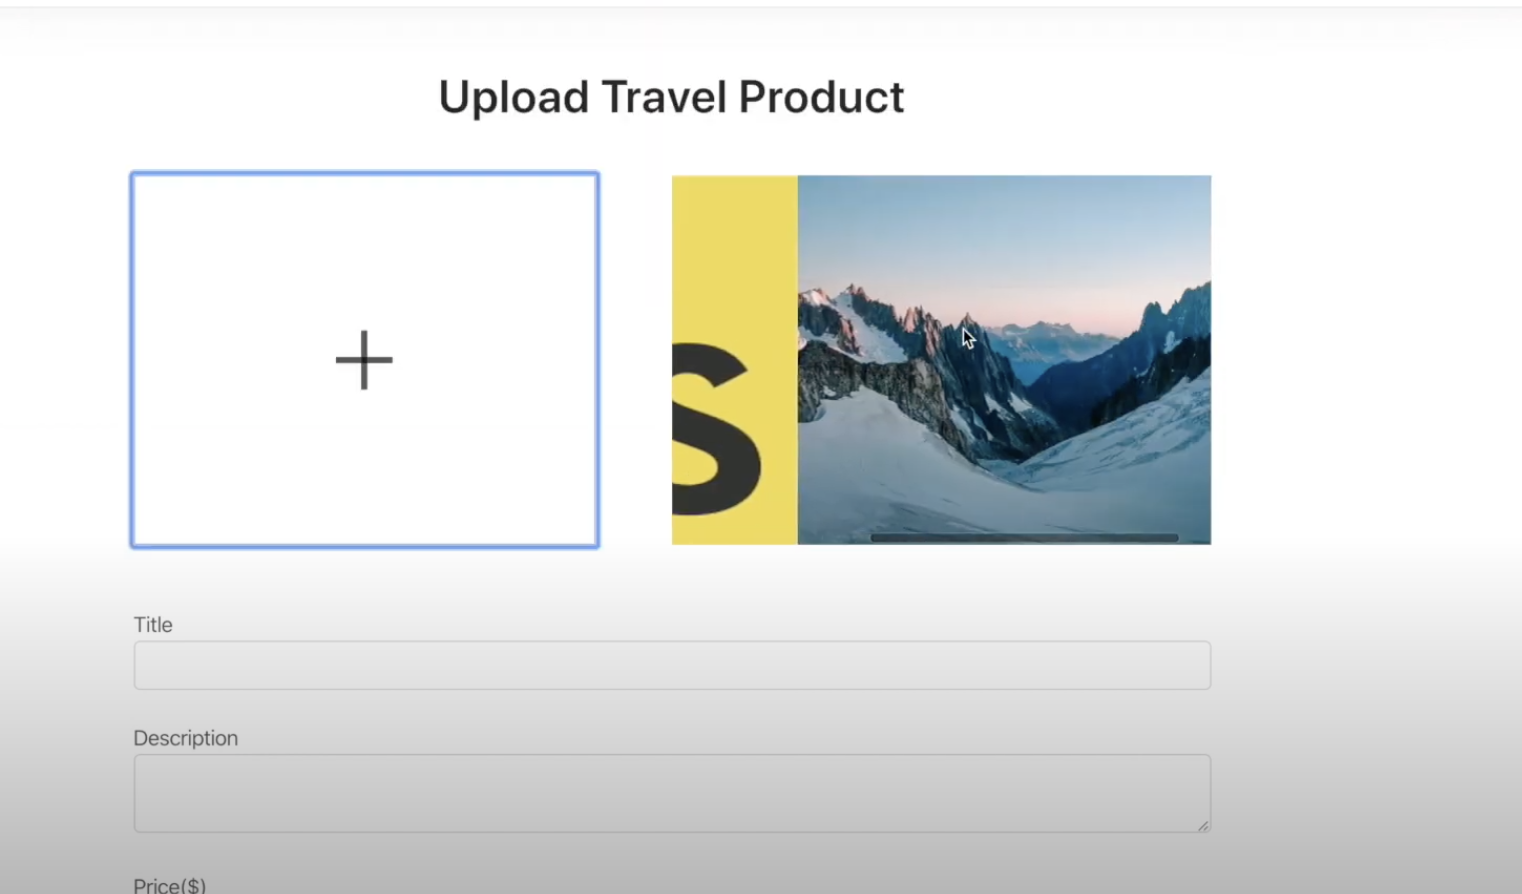
완성본 파일 업로드 기능 component 는 나중에 필요하다면 재사용하기 위해서
components>utils 폴더에 저장할 것이다.
먼저 utils>FileUpload.js파일을 만들어준다.
import React from 'react'

function FileUpload() {
    return (
        <div>

        </div>
    )
}

export default FileUpload
UploadProductPage에 import 해준다.
import FileUpload from '../../utils/FileUpload'
 {/* DropZone */}
                <FileUpload  />

                <br />
                <br />
drop-zone dependency를 다운받는다.
cd client 후 npm install react-dropzone --save해준다.
이후 FileUpload.js파일 형식을 만든다.
import React, { useState } from 'react'
import Dropzone from 'react-dropzone';
import { Icon } from 'antd';


function FileUpload(props) {


    return (
        <div style={{ display: 'flex', justifyContent: 'space-between' }}>
            <Dropzone
              	onDrop={onDrop}
                multiple={false}//drop은 한번에 하나만
                maxSize={800000000}
            >
 					{({ getRootProps, getInputProps }) => (
                    <div style={{
                        width: '300px', height: '240px', border: '1px solid lightgray',
                        display: 'flex', alignItems: 'center', justifyContent: 'center'
                    }}
                        {...getRootProps()}
                    >
                        {console.log('getRootProps', { ...getRootProps() })}
                        {console.log('getInputProps', { ...getInputProps() })}
                        <input {...getInputProps()} />
                        <Icon type="plus" style={{ fontSize: '3rem' }} />

                    </div>
                )}
            </Dropzone>

            <div style={{ display: 'flex', width: '350px', height: '240px', overflowX: 'scroll' }}>


                    <div onClick}>
                        <img/>
                    </div>
                ))}


            </div>

        </div>
    )
}

export default FileUpload
onDrop function을 만들어준다.
const onDrop = (files) => {

		//데이터를 서버에 보내줄때는 formData로 맞는 형식으로 보내주어야 한다.
        let formData = new FormData();
        const config = {
            header: { 'content-type': 'multipart/form-data' }
        }
        formData.append("file", files[0])

        //save the Image we chose inside the Node Server
        Axios.post('/api/product/uploadImage', formData, config)
            .then(response => {
                if (response.data.success) {

                } else {
                    alert('Failed to save the Image in Server')
                }
            })
    }
Axios를 작성해 줬으니 route로 가서 라우트를 작성해준다.
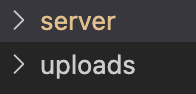
server>routes>product.js파일을 만들어준다.
server의 index.js파일로 가서 다음을 추가해준다.
app.use('/api/product', require('./routes/product'));router를 만들기 위해서는 1. 클라이언트에게서 파일을 받고 2. 받은 파일을 노드 js 서버에 보내주어야 하는데
이 과정에서 우리는 multer 가 필요하다.
npm install multer --save해서 다운받아주자.
multer를 사용하기 위해서 다음 문장을 복사해서 붙여넣어 준다.
const multer = require('multer');

var storage = multer.diskStorage({
    destination: (req, file, cb) => {//이미지 저장하고 싶은 곳(uploads 폴더 만들어서 거기에 저장하고 싶다.)
        cb(null, 'uploads/')
    },
    filename: (req, file, cb) => {
        cb(null, `${Date.now()}_${file.originalname}`)//이름은 파일날짜_오리지널네임
    },
    fileFilter: (req, file, cb) => {
        const ext = path.extname(file.originalname)
        if (ext !== '.jpg' || ext !== '.png') {//파일이 jpg나 png일 경우에만 가능하다
            return cb(res.status(400).end('only jpg, png are allowed'), false);
        }
        cb(null, true)
    }
})

var upload = multer({ storage: storage }).single("file")
uploads 폴더를 만들어준다. (파일들을 저장할 폴더)
//=================================
//             Product
//=================================


router.get("/uploadImage", auth, (req, res) => {
    //after getting that image from client

    //we need to save it inside nodejs server

    //Multer library
    //파일이 형식에 맞다면 파일을 업로드 할 것이다. 이미지랑 파일네임을 클라이언트에 다시 보내준다.
    upload(req,res, err=>{
        if(err) return res.json({success:false, err})
        return res.json({success:true, image: res.req.file.path, filename:res.req.file.filename})
    })
});

module.exports = router;
다음으로 FileUpload에서 서버에서 성공했을때 다음의 문장을 적어준다.
    const [Images, setImages] = useState([])//하나이상의 이미지를 저장할 것이기 때문에 배열을 쓴다.

    const onDrop = (files) => {

        Axios.post('/api/product/uploadImage', formData, config)
            .then(response => {
                if (response.data.success) {

                    setImages([...Images, response.data.image])//여러 이미지를 저장한다.

                } else {
                    alert('Failed to save the Image in Server')
                }
            })
여기서 우리가 저장한 이미지들을 부모인 UploadProductPage에 나타나게 해줘야하는데,
이에대한 state을 uploadProductPage에서 정해준다.
function UploadProductPage(props) {

    const [Images, setImages] = useState([])//state을 생성하고

    const updateImages = (newImages) => {//이미지 지정 함수도 만들고
        setImages(newImages)
    }

 				{/* DropZone */}//생성한걸 props로 넘겨준다.
                <FileUpload refreshFunction={updateImages} />
props로 넘어온 함수를 fileUpload에서 사용해서 새로운 이미지를 업데이트 해준다.
        Axios.post('/api/product/uploadImage', formData, config)
            .then(response => {
                if (response.data.success) {

                    setImages([...Images, response.data.image])//여러 이미지를 저장한다.
                    props.refreshFunction([...Images, response.data.image])

                } else {
                    alert('Failed to save the Image in Server')
                }
            })
FileUpload.js에서 업로드 된 이미지를 화면에 나타나도록 해주자.
            <div style={{ display: 'flex', width: '350px', height: '240px', overflowX: 'scroll' }}>

                {Images.map((image, index) => (
                    <div onClick={() => onDelete(image)}>
                        <img style={{ minWidth: '300px', width: '300px', height: '240px' }} src={`http://localhost:5000/${image}`} alt={`productImg-${index}`} />
                    </div>
                ))}


            </div>
onDelete function도 만들어 주자.
이미지는 배열로 들어와 있기 때문에 이미지의 인덱스를 파악해서 삭제해주면 된다.
const onDelete = (image) => { const currentIndex = Images.indexOf(image); let newImages = [...Images] newImages.splice(currentIndex, 1)//인덱스에 맞는 이미지 1개를 삭제한다. setImages(newImages)//삭제한 이미지로 바꿔준다. props.refreshFunction(newImages)//부모에게도 알려준다. }'NODE.JS' 카테고리의 다른 글
OnlineShop 만들기 - 4) Landing Page 만들기 1(상품리스트 가져오기) (0) 2021.05.15 OnlineShop 만들기 - 3)업로드 페이지에 onSubmit 기능 만들기 (0) 2021.05.15 OnlineShop 만들기 - 1)mongoDB연결하고 업로드페이지 만들기 (0) 2021.05.15 ChatBot 만들기 - 5) actions추가하기 (1) 2021.05.15 ChatBot 만들기 - 4) card 메세지 나타내기 (0) 2021.05.15