-
ELK스택 기본사용법 - ② Kibana데이터베이스 2022. 10. 31. 09:46
저번 시간에 이어 이번에는 ELK 스택의 Kibana를 활용하는 방법을 정리해 보았다.
학습한 내용과 사진, 코드는 모두 다음의 강의에서 참고하였다!🙌
참고한 강의 (플레이리스트)
↓
https://www.youtube.com/watch?v=3iA-ncqAqYE&list=PLVNY1HnUlO24LCsgOxR_eK2Yi4sOgH9Pg&index=19
github : 강의 참고 자료
↓
https://github.com/minsuk-heo/BigData
GitHub - minsuk-heo/BigData
Contribute to minsuk-heo/BigData development by creating an account on GitHub.
github.com
이전 블로그 (ElasticSearch)
↓
https://dodop-blog.tistory.com/410
ELK스택 기본사용법 - ① ElasticSearch
ELK (Elastic search, Logstash, Kibana) 스택에 대해서 들어보기는 했지만 어떻게 동작하는지 몰라서 간단한 강의를 듣고 실습해 보았다! 학습한 내용과 사진, 코드는 모두 다음의 강의에서 참고하였다!
dodop-blog.tistory.com
Kibana
Kibana는 HTML과 Javascript 엔진으로 분석 결과를 시각화 할 때 사용되며 ElasticSearch에서 받아온 데이터를 시각화 하는데 쓰여진다.
설치하기
macOS를 사용하고 있어 brew 명령어를 이용하여 설치를 진행하였다.
참고사이트
↓
https://logz.io/blog/brew-install-elasticsearch-mac/
Use Brew to Install Elasticsearch on Mac OS X | Logz.io
Use Homebrew to brew install Elasticsearch on Mac, along with the rest of the ELK Stack—Kibana, Filebeat, Metricbeat, and Logstash—with this tutorial
logz.io
$ brew install elastic/tap/kibana-full설치가 끝나면 저장 위치도 함께 확인할 수 있다. 나의 경우는 다음과 같았다.
/opt/homebrew/etc/kibana/여기서 실행 전에 먼저 config 설정을 통해서 server host와 ElasticSearch URL을 지정해준다.
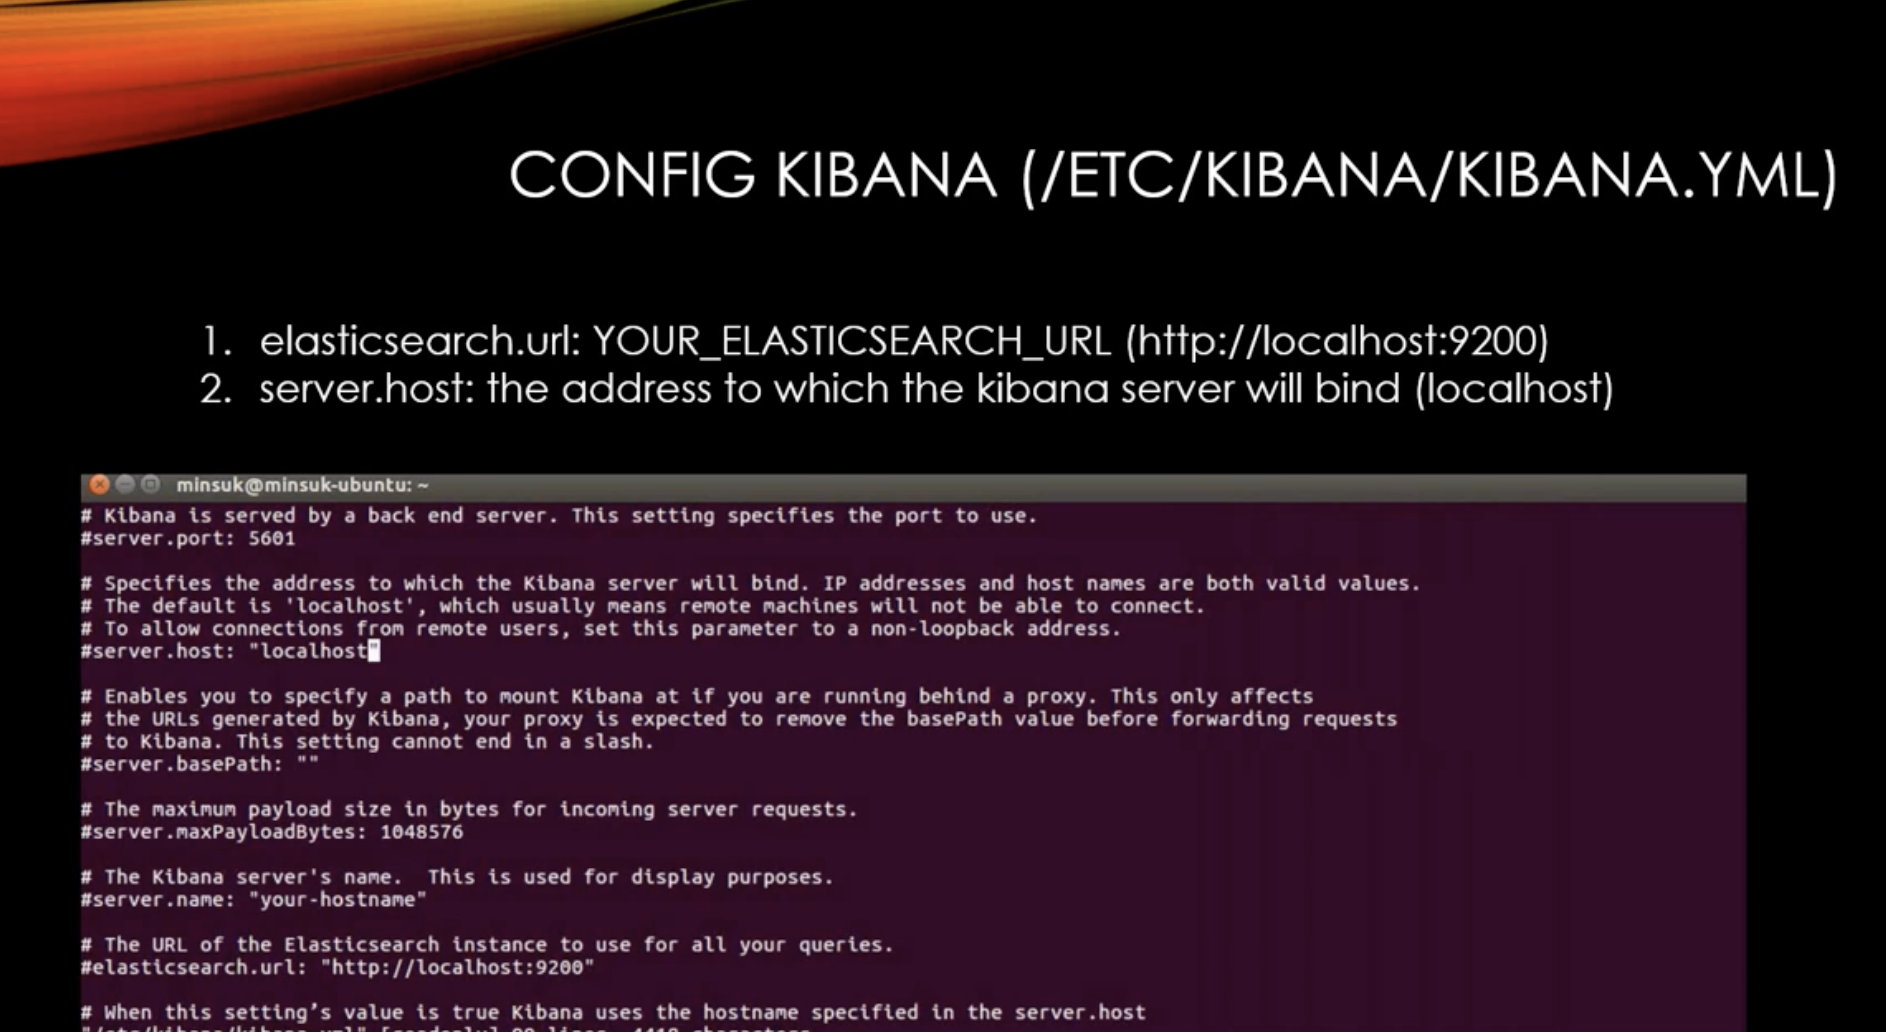
엘라스틱 서치와 키바나가 같은 서버내에 있다고 생각하고 위와 같이 설정을 바꿔주면된다. $ vi /opt/homebrew/etc/kibana/kibana.yml # Specifies the address to which the Kibana server will bind. IP addresses and host names are both valid values. # The default is 'localhost', which usually means remote machines will not be able to connect. # To allow connections from remote users, set this parameter to a non-loopback address. server.host: "localhost" # The URLs of the Elasticsearch instances to use for all your queries. elasticsearch.hosts: ["http://localhost:9200"]설정이 완료되면 키바나를 다음 명령어로 실행할 수 있다.
$ brew services start elastic/tap/kibana-full실행시 나오는 문구로 실행 URL을 다음과 같이 확인할 수 있다. (초기 5601번 포트에서 실행)
http://localhost:5601인덱스 받아오기
먼저 ElasticSearch를 통해서 Kibana에서 시각화 해 줄 데이터 넣는다.
% curl -X POST 'http://localhost:9200/_bulk?pretty'  -H 'Content-Type: application/json' --data-binary @bulk_basketball.js
{
  "took" : 84,
  "errors" : false,
  "items" : [
    {
      "index" : {
        "_index" : "basketball",
        "_type" : "record",
        "_id" : "1",
        "_version" : 2,
        "result" : "updated",
        "_shards" : {
          "total" : 2,
          "successful" : 1,
          "failed" : 0
        },
        "_seq_no" : 4,
        "_primary_term" : 2,
        "status" : 200
      }
    },
    {
      "index" : {
        "_index" : "basketball",
        "_type" : "record",
        "_id" : "2",
        "_version" : 2,
        "result" : "updated",
        "_shards" : {
          "total" : 2,
          "successful" : 1,
          "failed" : 0
        },
        "_seq_no" : 5,
        "_primary_term" : 2,
        "status" : 200
      }
    },
    {
      "index" : {
        "_index" : "basketball",
        "_type" : "record",
        "_id" : "3",
        "_version" : 2,
        "result" : "updated",
        "_shards" : {
          "total" : 2,
          "successful" : 1,
          "failed" : 0
        },
        "_seq_no" : 6,
        "_primary_term" : 2,
        "status" : 200
      }
    },
    {
      "index" : {
        "_index" : "basketball",
        "_type" : "record",
        "_id" : "4",
        "_version" : 2,
        "result" : "updated",
        "_shards" : {
          "total" : 2,
          "successful" : 1,
          "failed" : 0
        },
        "_seq_no" : 7,
        "_primary_term" : 2,
        "status" : 200
      }
    },
    {
      "index" : {
        "_index" : "basketball",
        "_type" : "record",
        "_id" : "5",
        "_version" : 1,
        "result" : "created",
        "_shards" : {
          "total" : 2,
          "successful" : 1,
          "failed" : 0
        },
        "_seq_no" : 8,
        "_primary_term" : 2,
        "status" : 201
      }
    },
    {
      "index" : {
        "_index" : "basketball",
        "_type" : "record",
        "_id" : "6",
        "_version" : 1,
        "result" : "created",
        "_shards" : {
          "total" : 2,
          "successful" : 1,
          "failed" : 0
        },
        "_seq_no" : 9,
        "_primary_term" : 2,
        "status" : 201
      }
    },
    {
      "index" : {
        "_index" : "basketball",
        "_type" : "record",
        "_id" : "7",
        "_version" : 1,
        "result" : "created",
        "_shards" : {
          "total" : 2,
          "successful" : 1,
          "failed" : 0
        },
        "_seq_no" : 10,
        "_primary_term" : 2,
        "status" : 201
      }
    },
    {
      "index" : {
        "_index" : "basketball",
        "_type" : "record",
        "_id" : "8",
        "_version" : 1,
        "result" : "created",
        "_shards" : {
          "total" : 2,
          "successful" : 1,
          "failed" : 0
        },
        "_seq_no" : 11,
        "_primary_term" : 2,
        "status" : 201
      }
    },
    {
      "index" : {
        "_index" : "basketball",
        "_type" : "record",
        "_id" : "9",
        "_version" : 1,
        "result" : "created",
        "_shards" : {
          "total" : 2,
          "successful" : 1,
          "failed" : 0
        },
        "_seq_no" : 12,
        "_primary_term" : 2,
        "status" : 201
      }
    },
    {
      "index" : {
        "_index" : "basketball",
        "_type" : "record",
        "_id" : "10",
        "_version" : 1,
        "result" : "created",
        "_shards" : {
          "total" : 2,
          "successful" : 1,
          "failed" : 0
        },
        "_seq_no" : 13,
        "_primary_term" : 2,
        "status" : 201
      }
    },
    {
      "index" : {
        "_index" : "basketball",
        "_type" : "record",
        "_id" : "11",
        "_version" : 1,
        "result" : "created",
        "_shards" : {
          "total" : 2,
          "successful" : 1,
          "failed" : 0
        },
        "_seq_no" : 14,
        "_primary_term" : 2,
        "status" : 201
      }
    },
    {
      "index" : {
        "_index" : "basketball",
        "_type" : "record",
        "_id" : "12",
        "_version" : 1,
        "result" : "created",
        "_shards" : {
          "total" : 2,
          "successful" : 1,
          "failed" : 0
        },
        "_seq_no" : 15,
        "_primary_term" : 2,
        "status" : 201
      }
    },
    {
      "index" : {
        "_index" : "basketball",
        "_type" : "record",
        "_id" : "13",
        "_version" : 1,
        "result" : "created",
        "_shards" : {
          "total" : 2,
          "successful" : 1,
          "failed" : 0
        },
        "_seq_no" : 16,
        "_primary_term" : 2,
        "status" : 201
      }
    },
    {
      "index" : {
        "_index" : "basketball",
        "_type" : "record",
        "_id" : "14",
        "_version" : 1,
        "result" : "created",
        "_shards" : {
          "total" : 2,
          "successful" : 1,
          "failed" : 0
        },
        "_seq_no" : 17,
        "_primary_term" : 2,
        "status" : 201
      }
    },
    {
      "index" : {
        "_index" : "basketball",
        "_type" : "record",
        "_id" : "15",
        "_version" : 1,
        "result" : "created",
        "_shards" : {
          "total" : 2,
          "successful" : 1,
          "failed" : 0
        },
        "_seq_no" : 18,
        "_primary_term" : 2,
        "status" : 201
      }
    },
    {
      "index" : {
        "_index" : "basketball",
        "_type" : "record",
        "_id" : "16",
        "_version" : 1,
        "result" : "created",
        "_shards" : {
          "total" : 2,
          "successful" : 1,
          "failed" : 0
        },
        "_seq_no" : 19,
        "_primary_term" : 2,
        "status" : 201
      }
    }
  ]
}
그 다음 Kibana 사이트 (http://localhost:5601) 에 접속하여 입력한 데이터를 시각화 해보자.
먼저 입력한 인덱스를 Kibana에서 받아오도록 설정한다.
Index Pattern -> Create index pattern -> 이름 : [인덱스명], 타임스탬프 필드 : [submit_date]

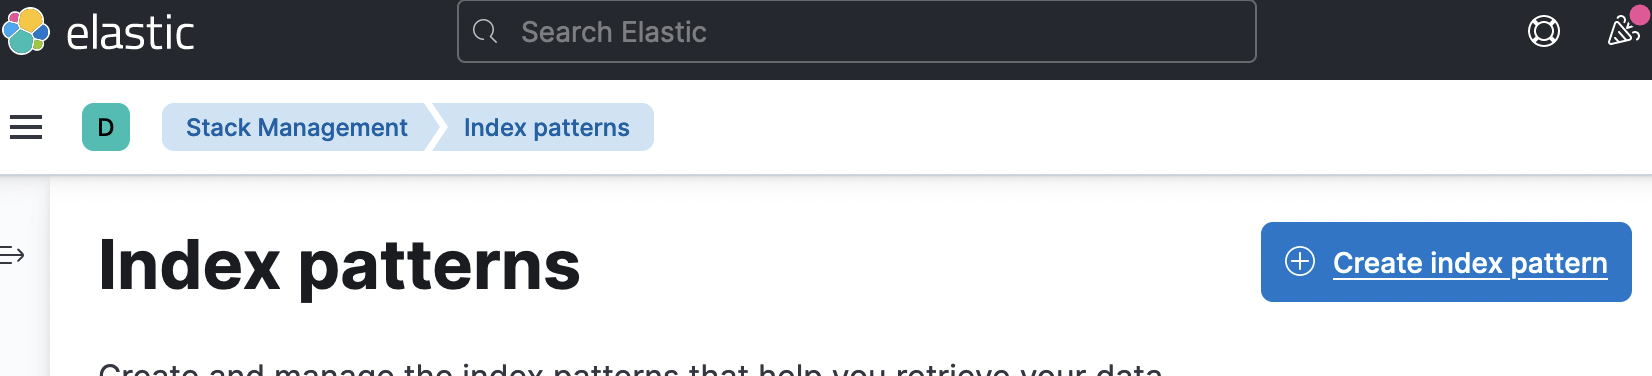

데이터를 무사히 받아오면 다음과 같이 인덱스를 잘 받아온 것을 확인할 수 있다.

Discover
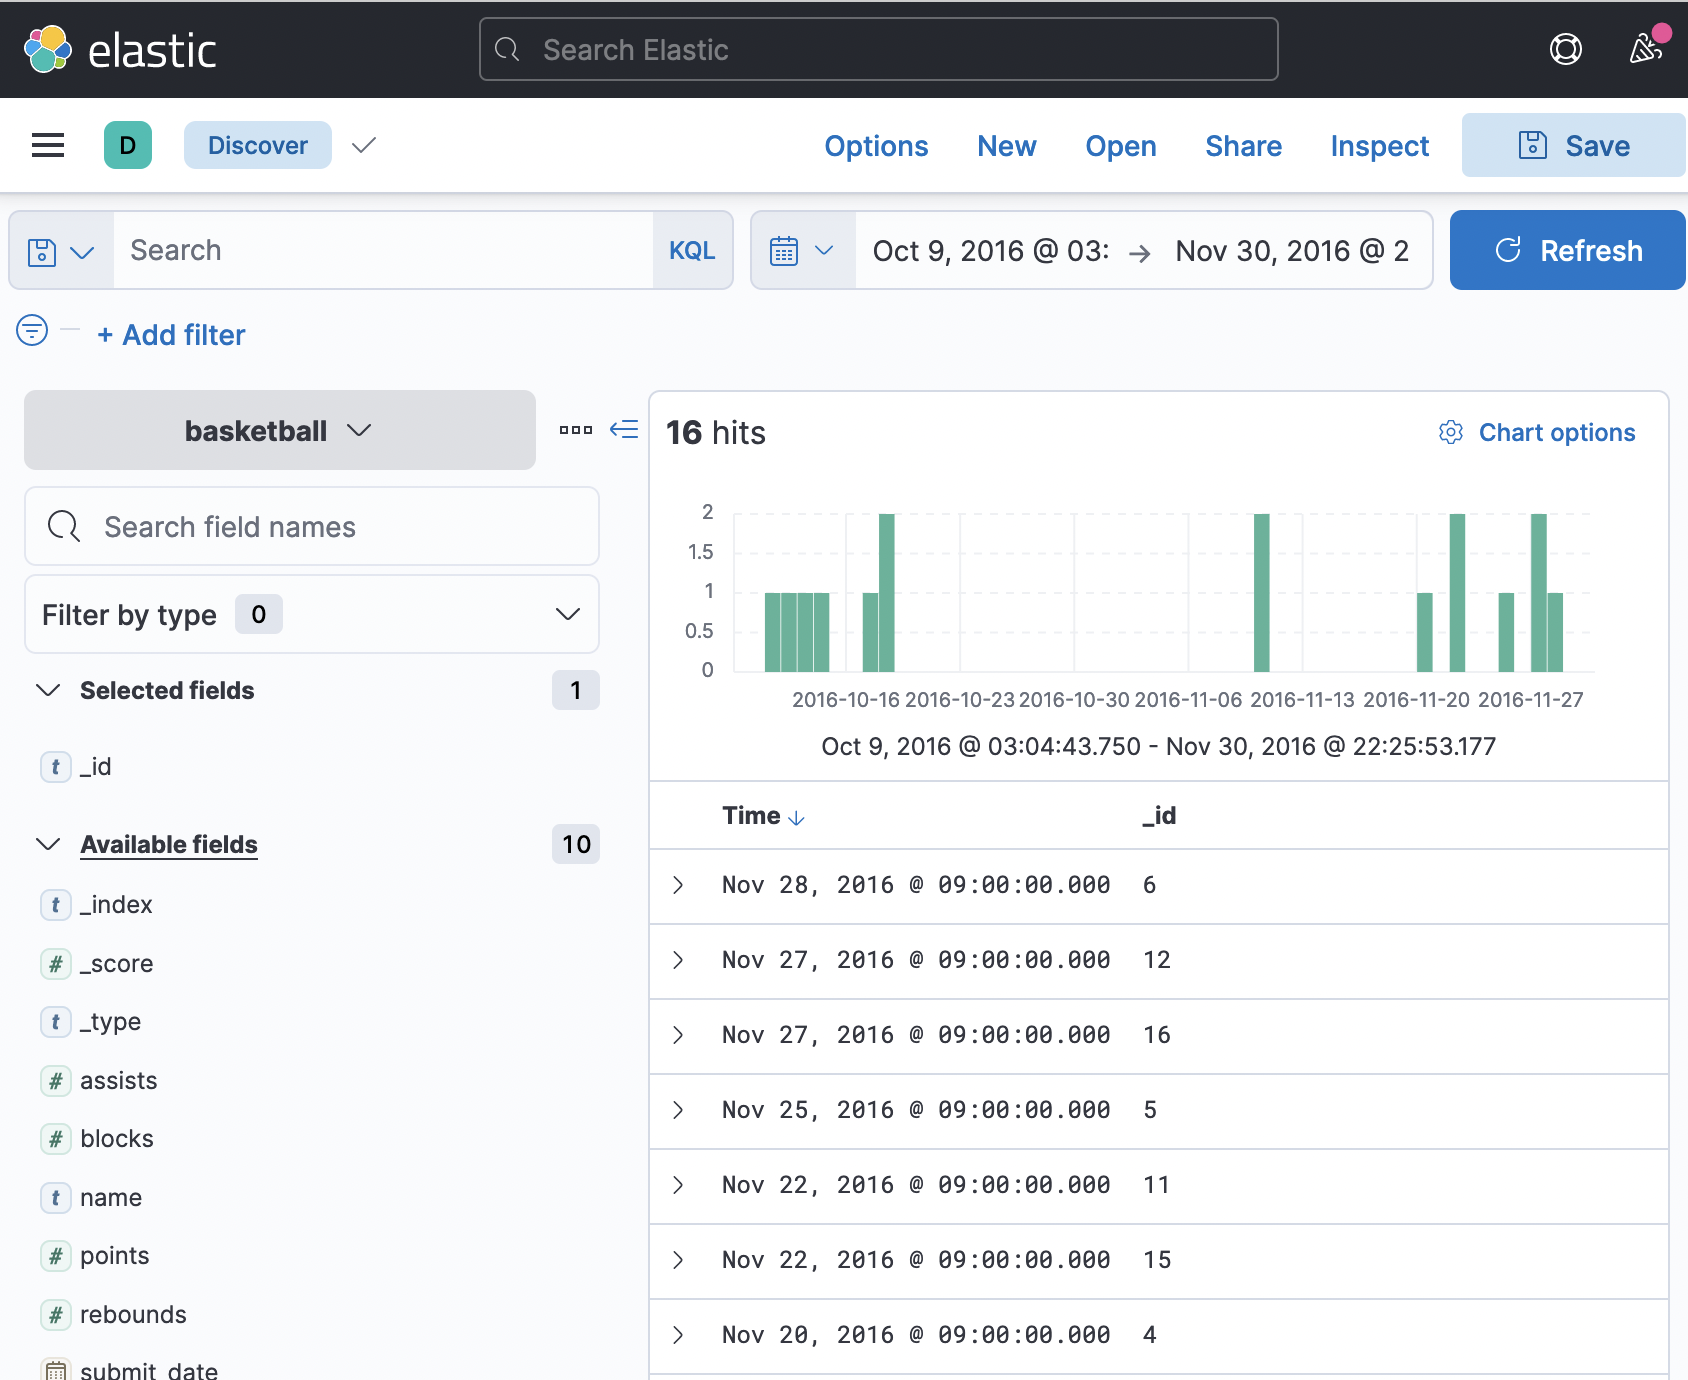
이번엔 Kibana Discover를 사용하여 데이터 차트를 확인하도록 하자.
인덱스를 basketball로 선택하고 결과를 봤을 때 처음에 'no results found' 결과가 뜬다면 검색 기간을 지난 15년으로 변경한다면 자료를 확인할 수 있다.
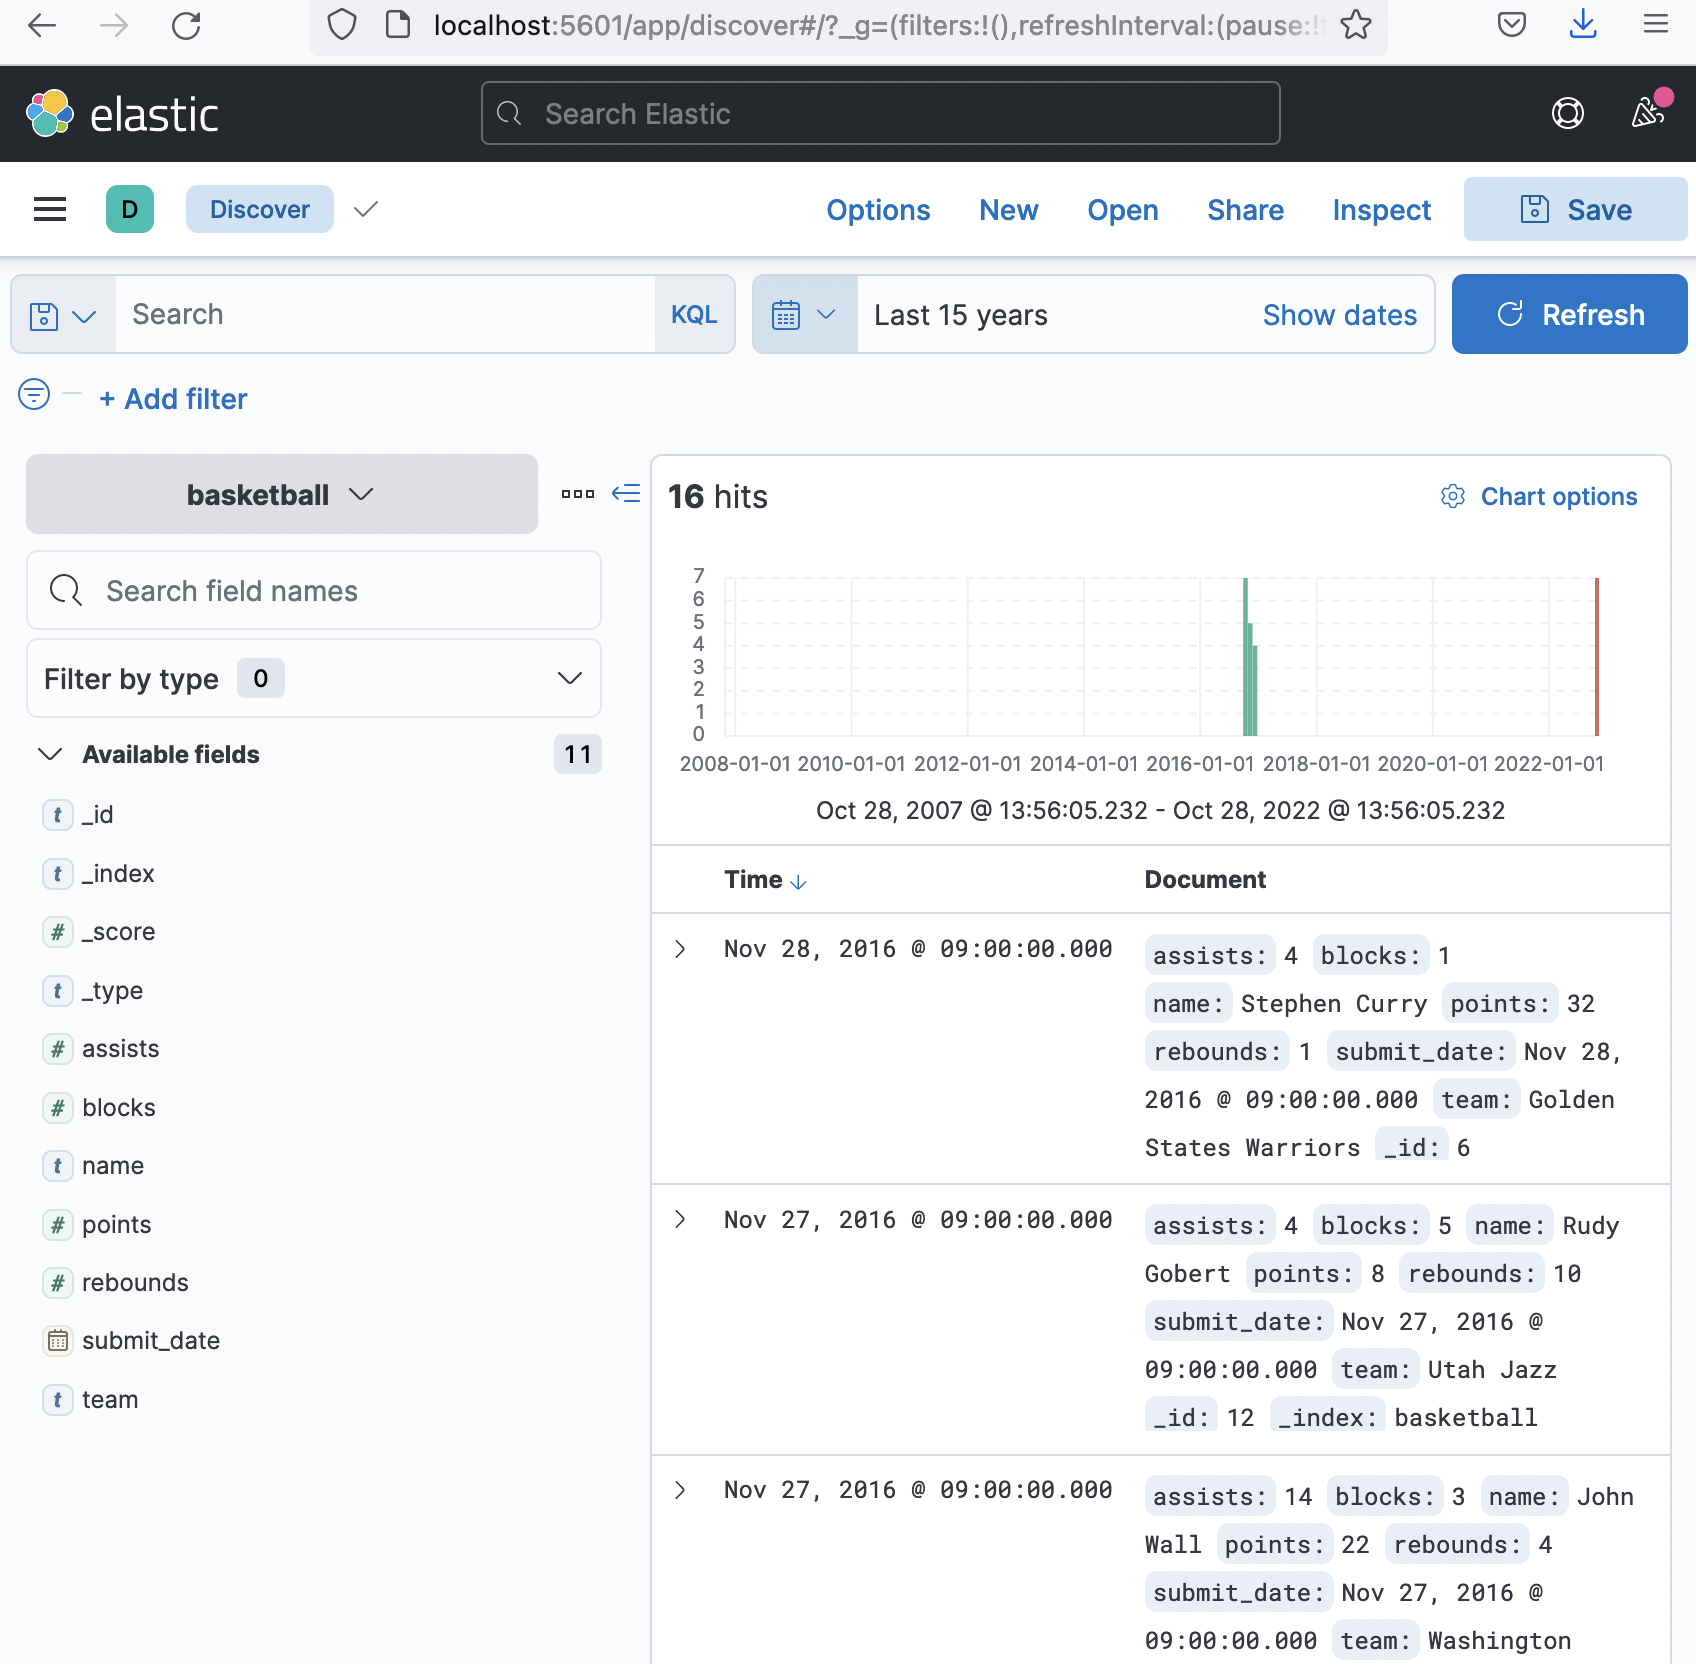
타임필터를 이용해서 차트를 볼 수 있고 아래 테이블에서도 필터 필드들을 확인할 수 있다.
보여지는 바 차트를 hover하면 도큐먼트의 갯수가 뜨는 것을 확인할 수 있다.
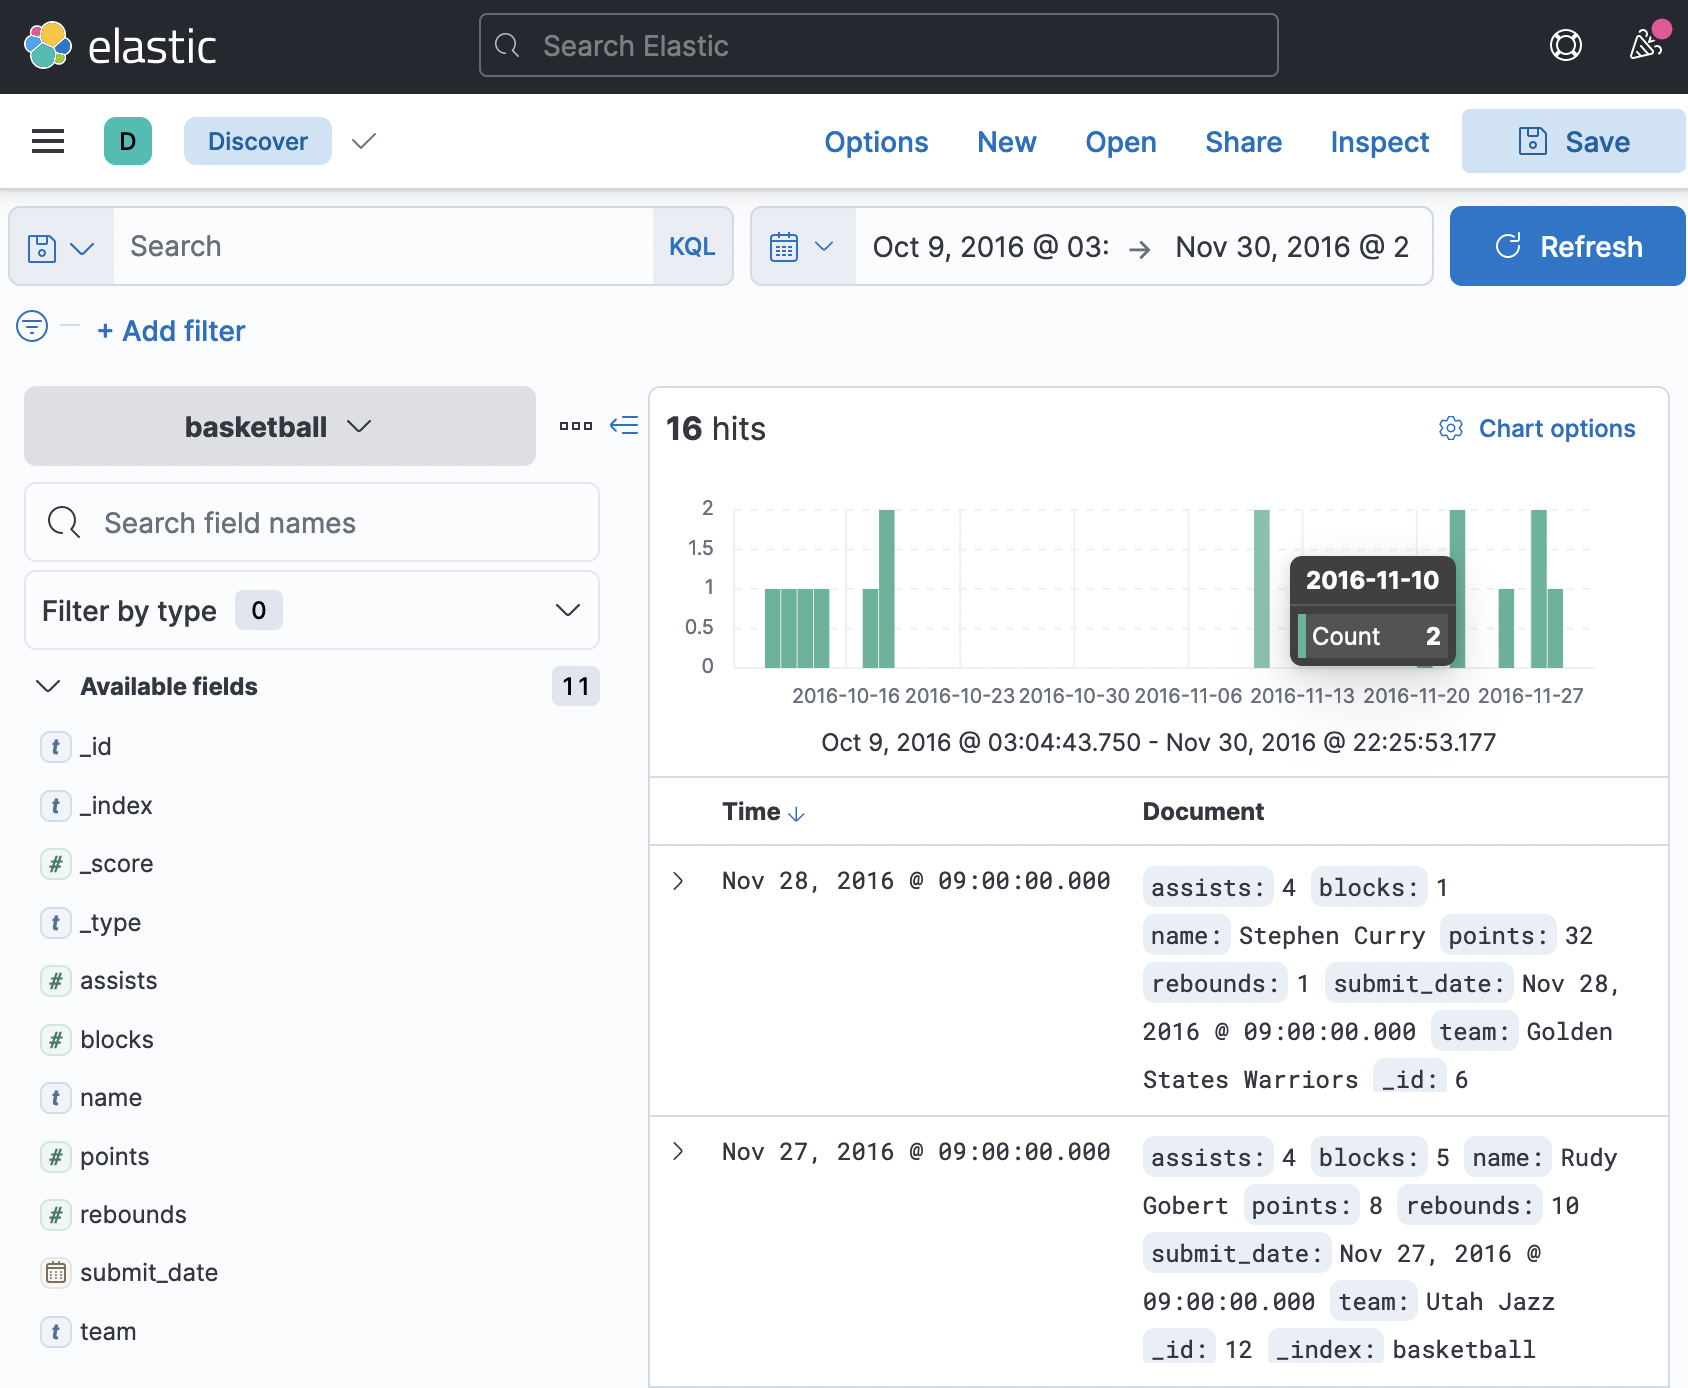
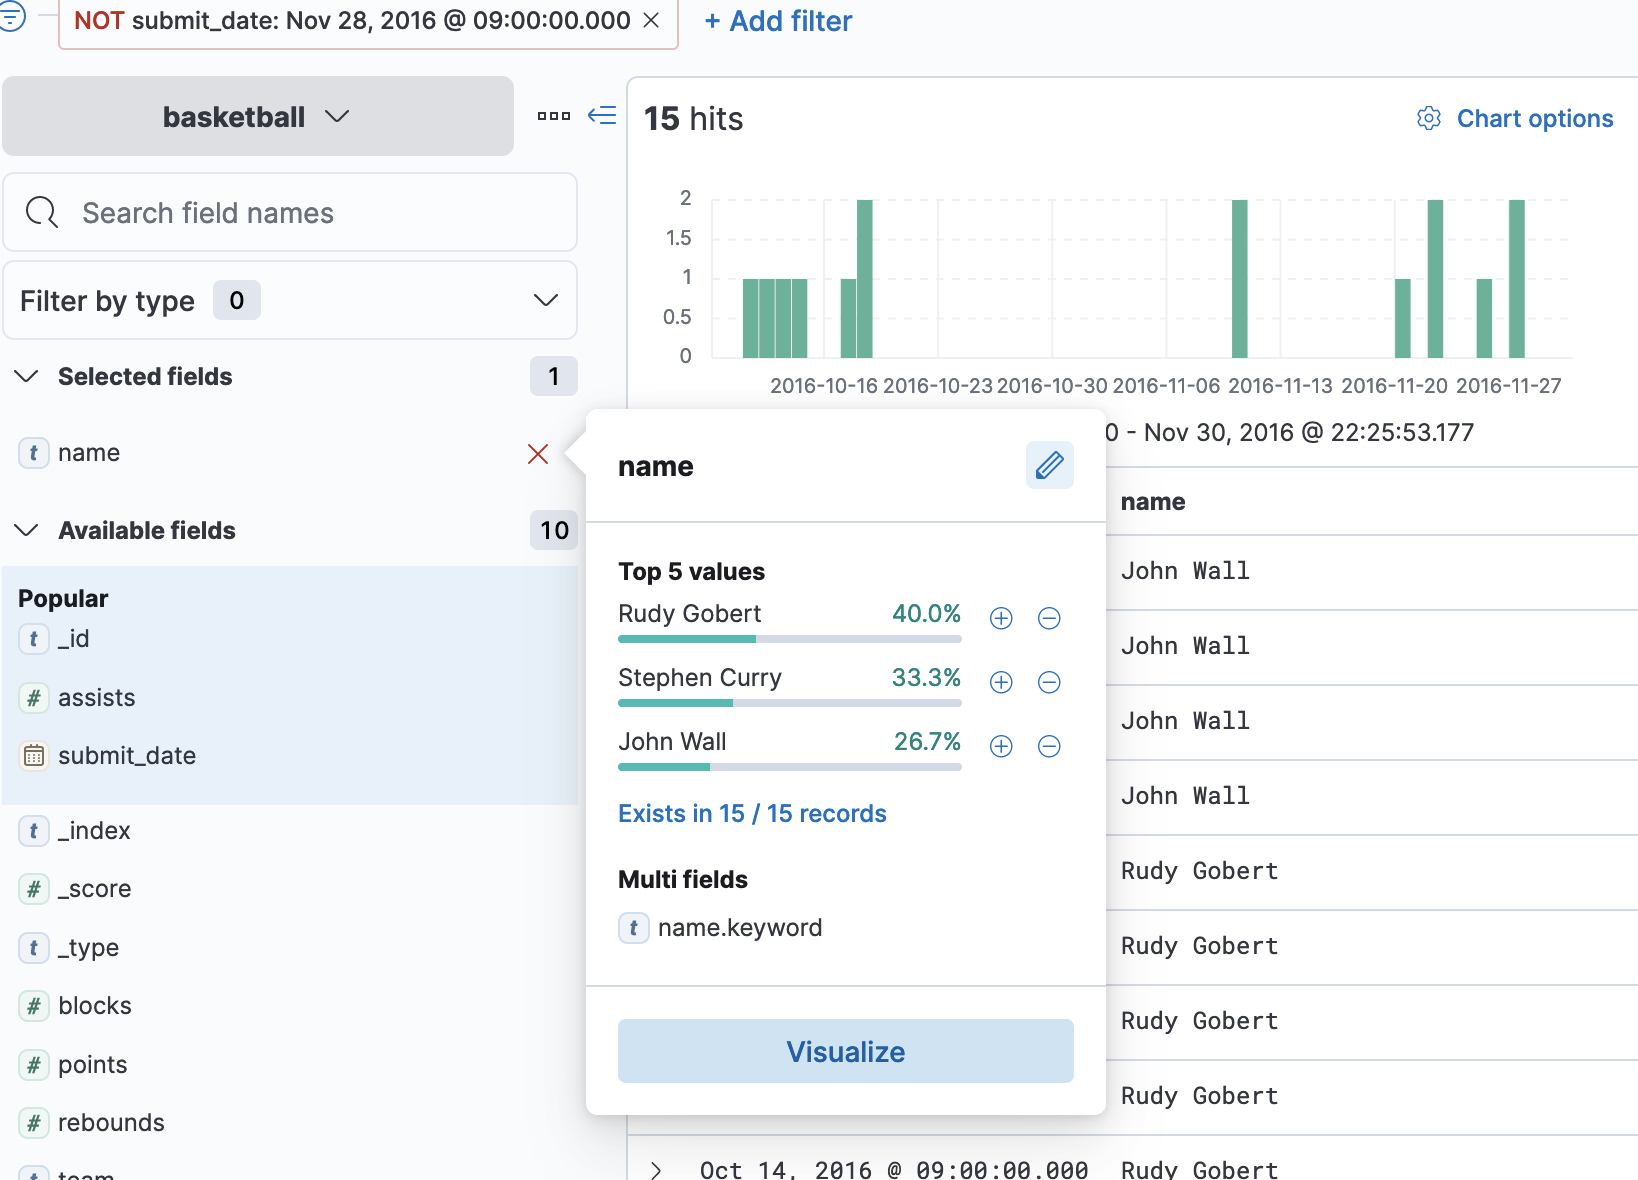
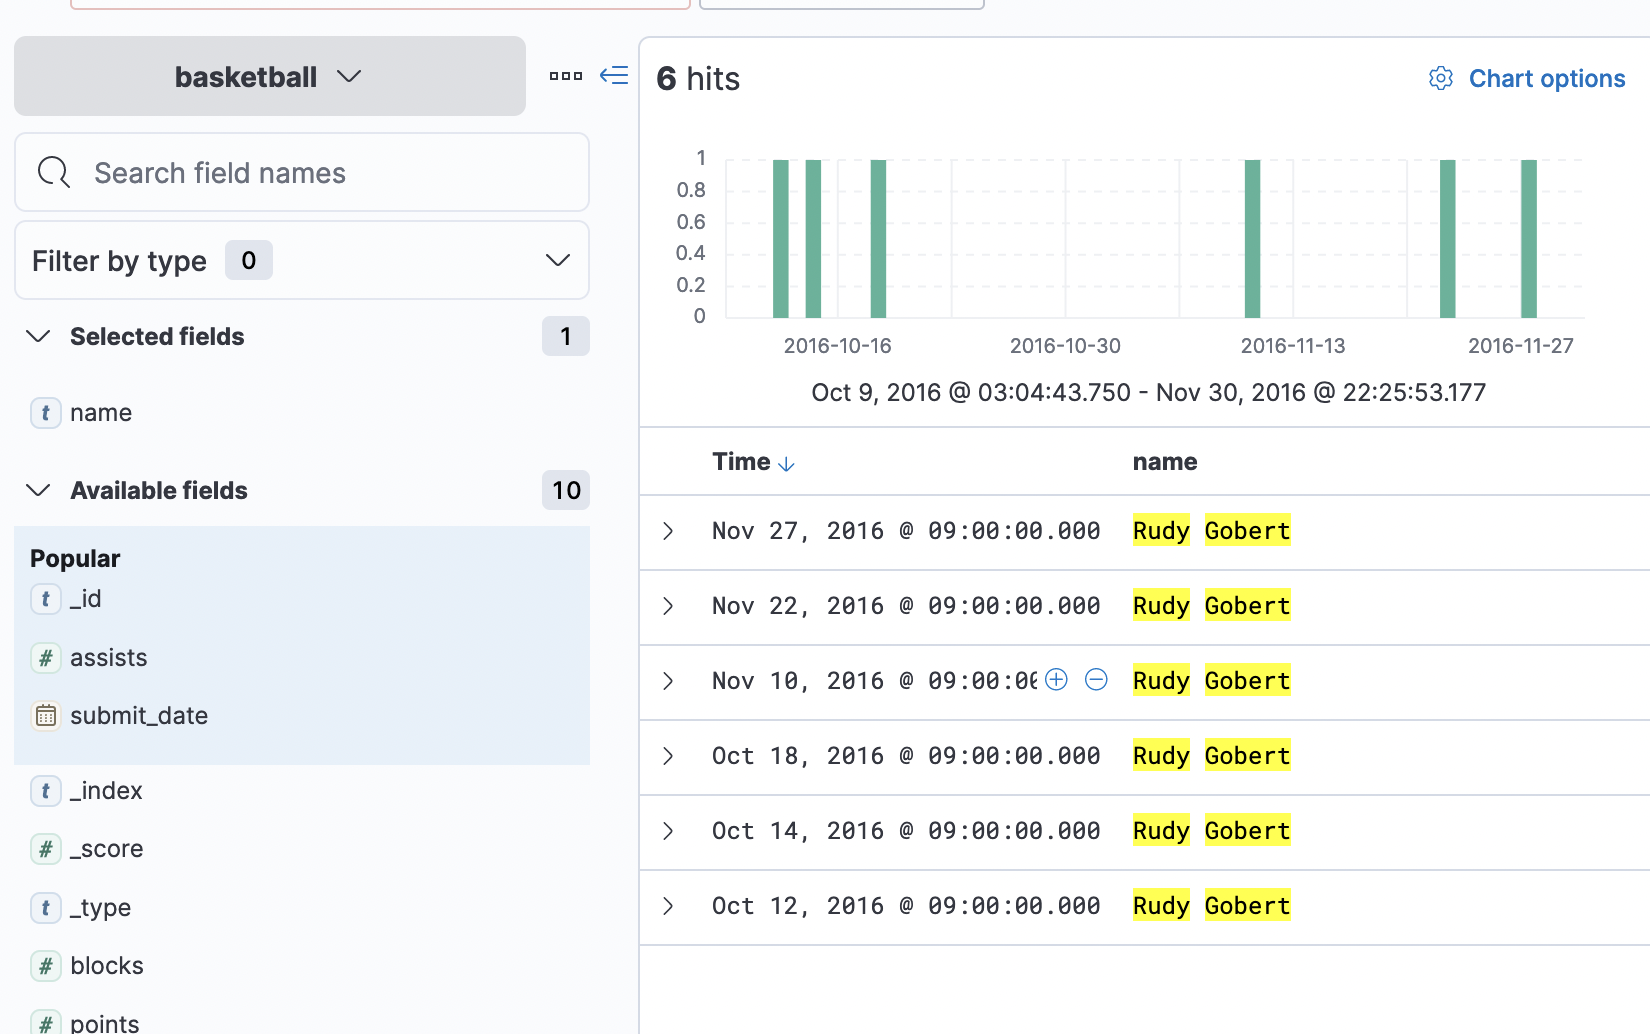
여기서 + 버튼을 이용해서 필터를 추가할 수 있다.
+ 버튼 누르면 필터를 추가할 수 있다 필터에 hover를 통해 확인되는 top values등을 이용해 특정 데이터만 볼 수도 있다.
Visualize
이번엔 Kibana Visualize를 이용해서 파이차트나 바 차트 등으로 시각화 해보자. (키바나 7.11 기준으로는 Aggregation based)
Bar
먼저 바 차트로 만들어보자.
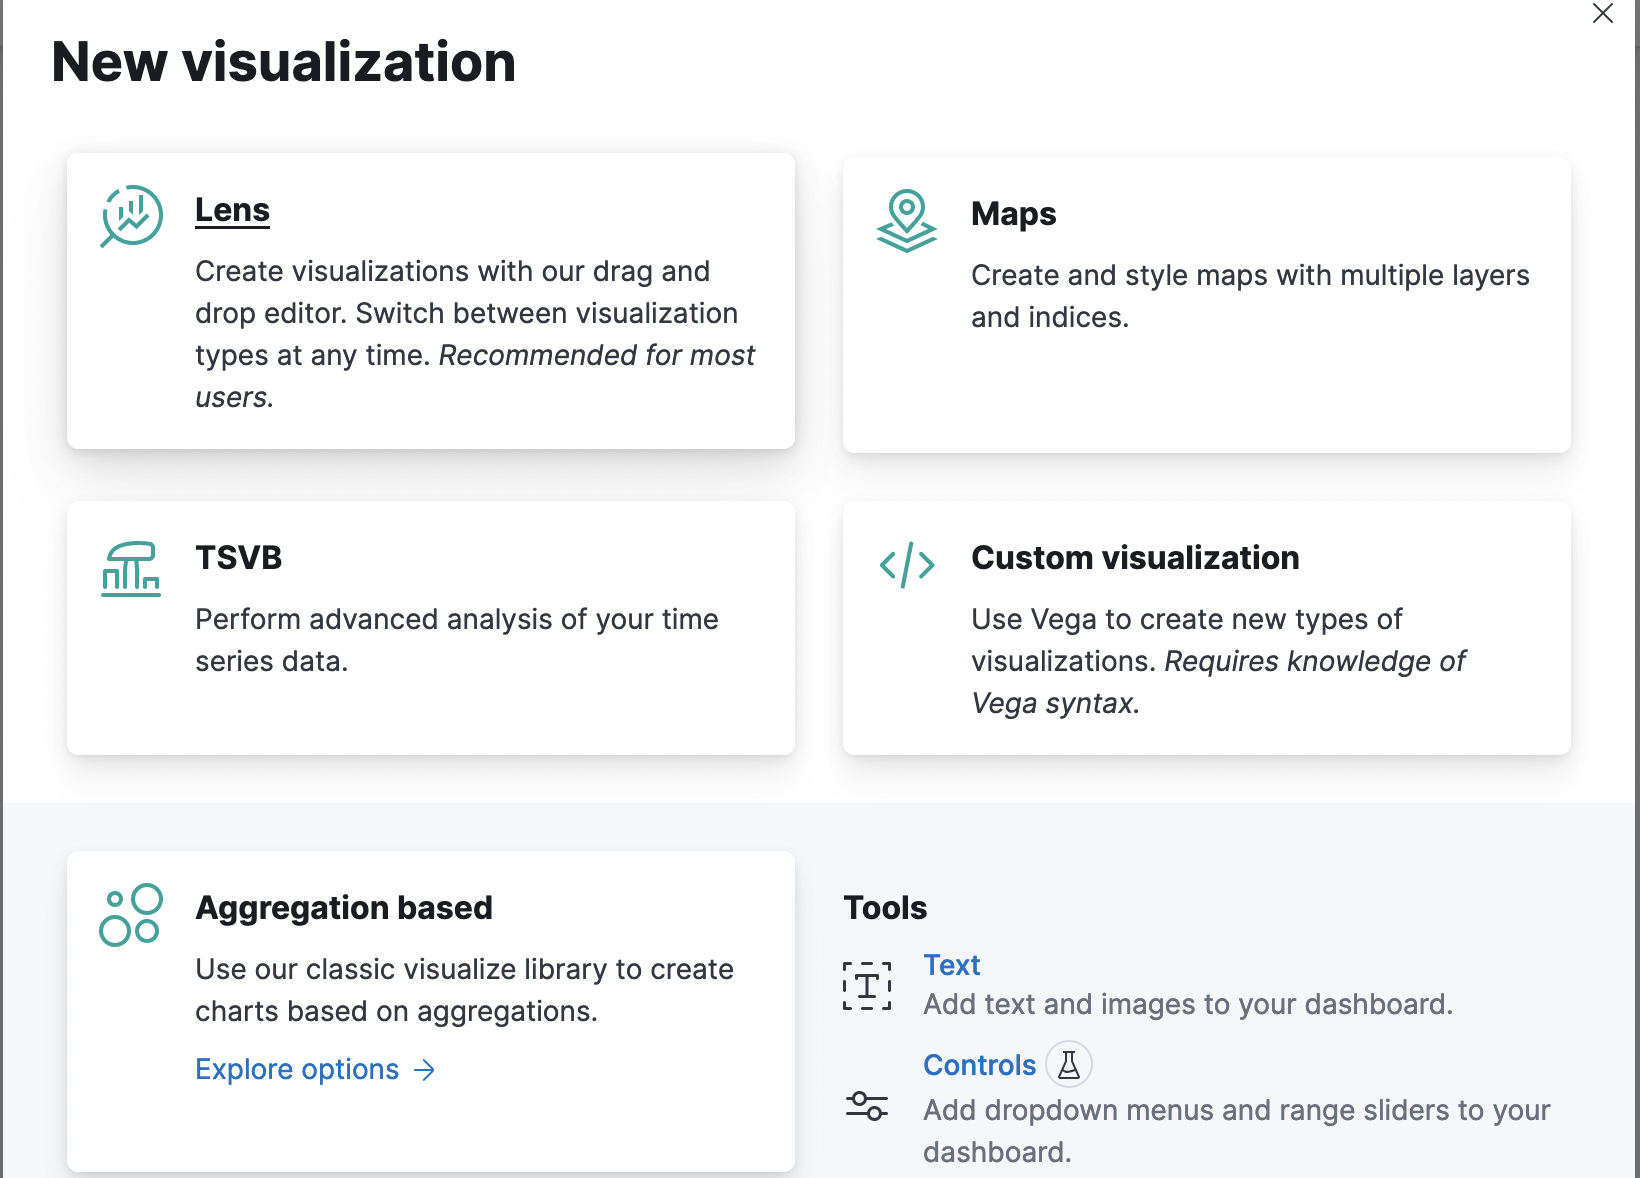
좌측 바의 Visualize Library -> create new visualization -> lens -> bar vertical stack

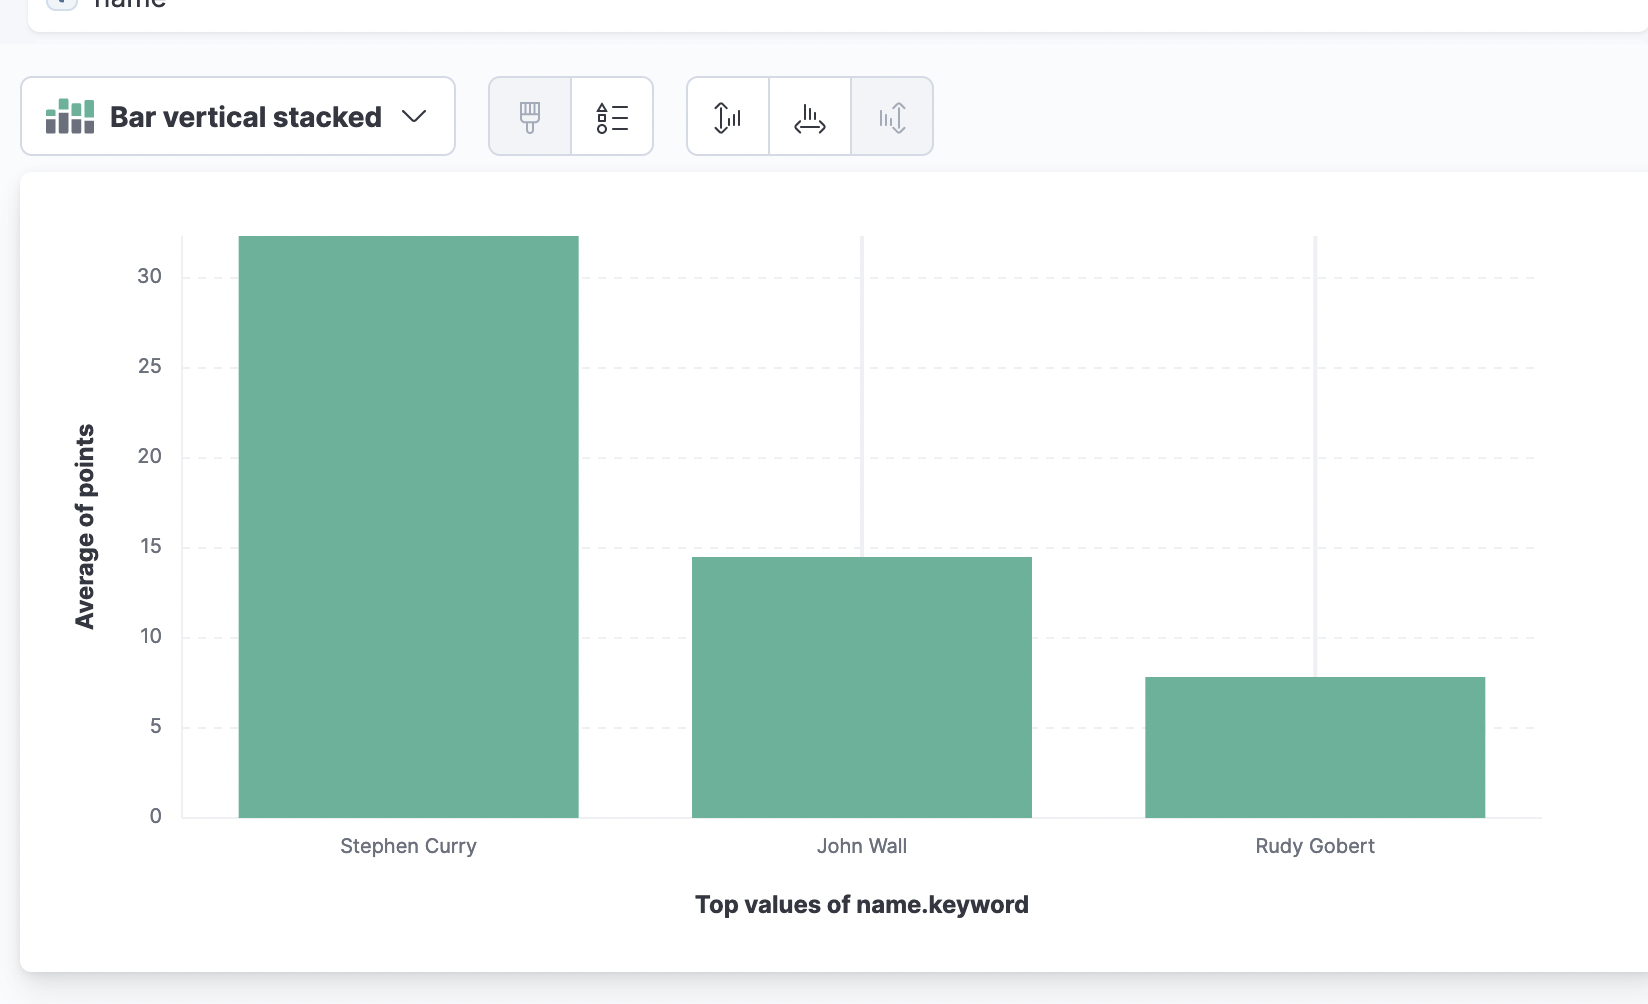
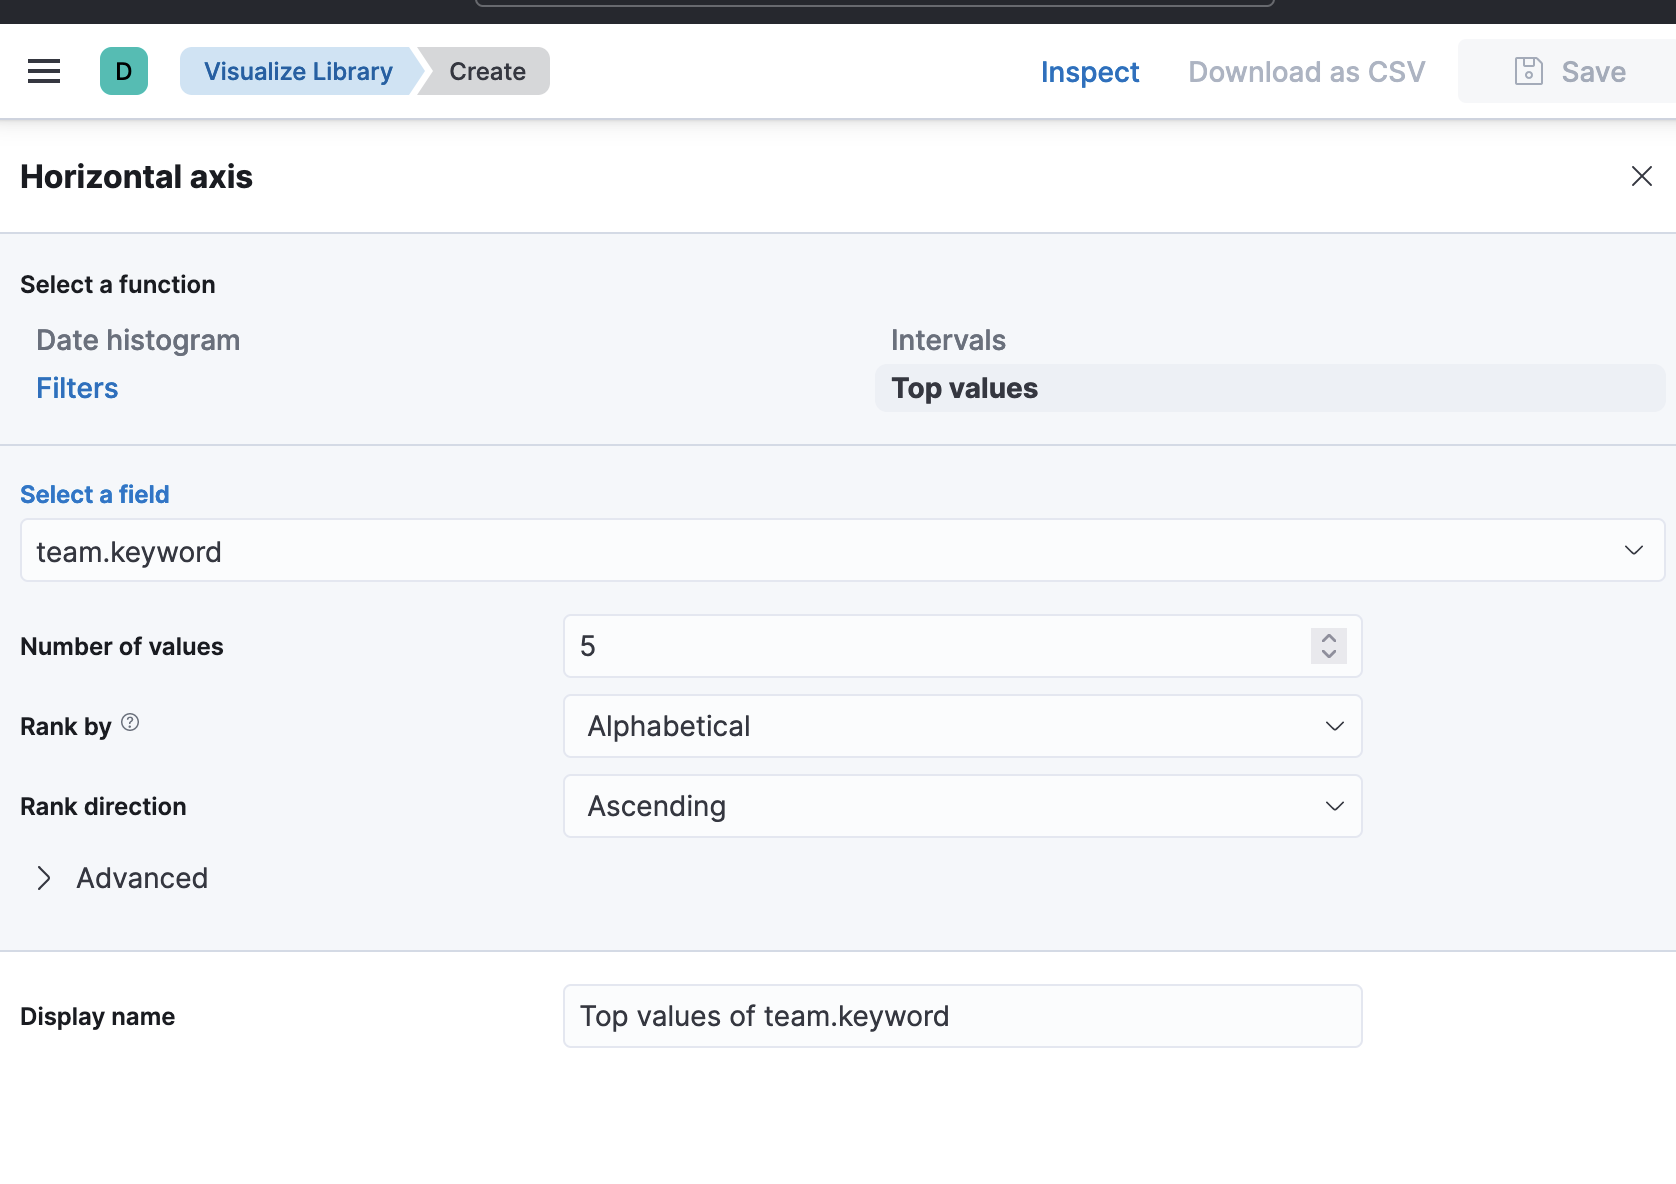
각 선수별로 평균 점수를 확인하기 위해 y축 기준과 x축 기준은 다음과 같이 설정해준다.

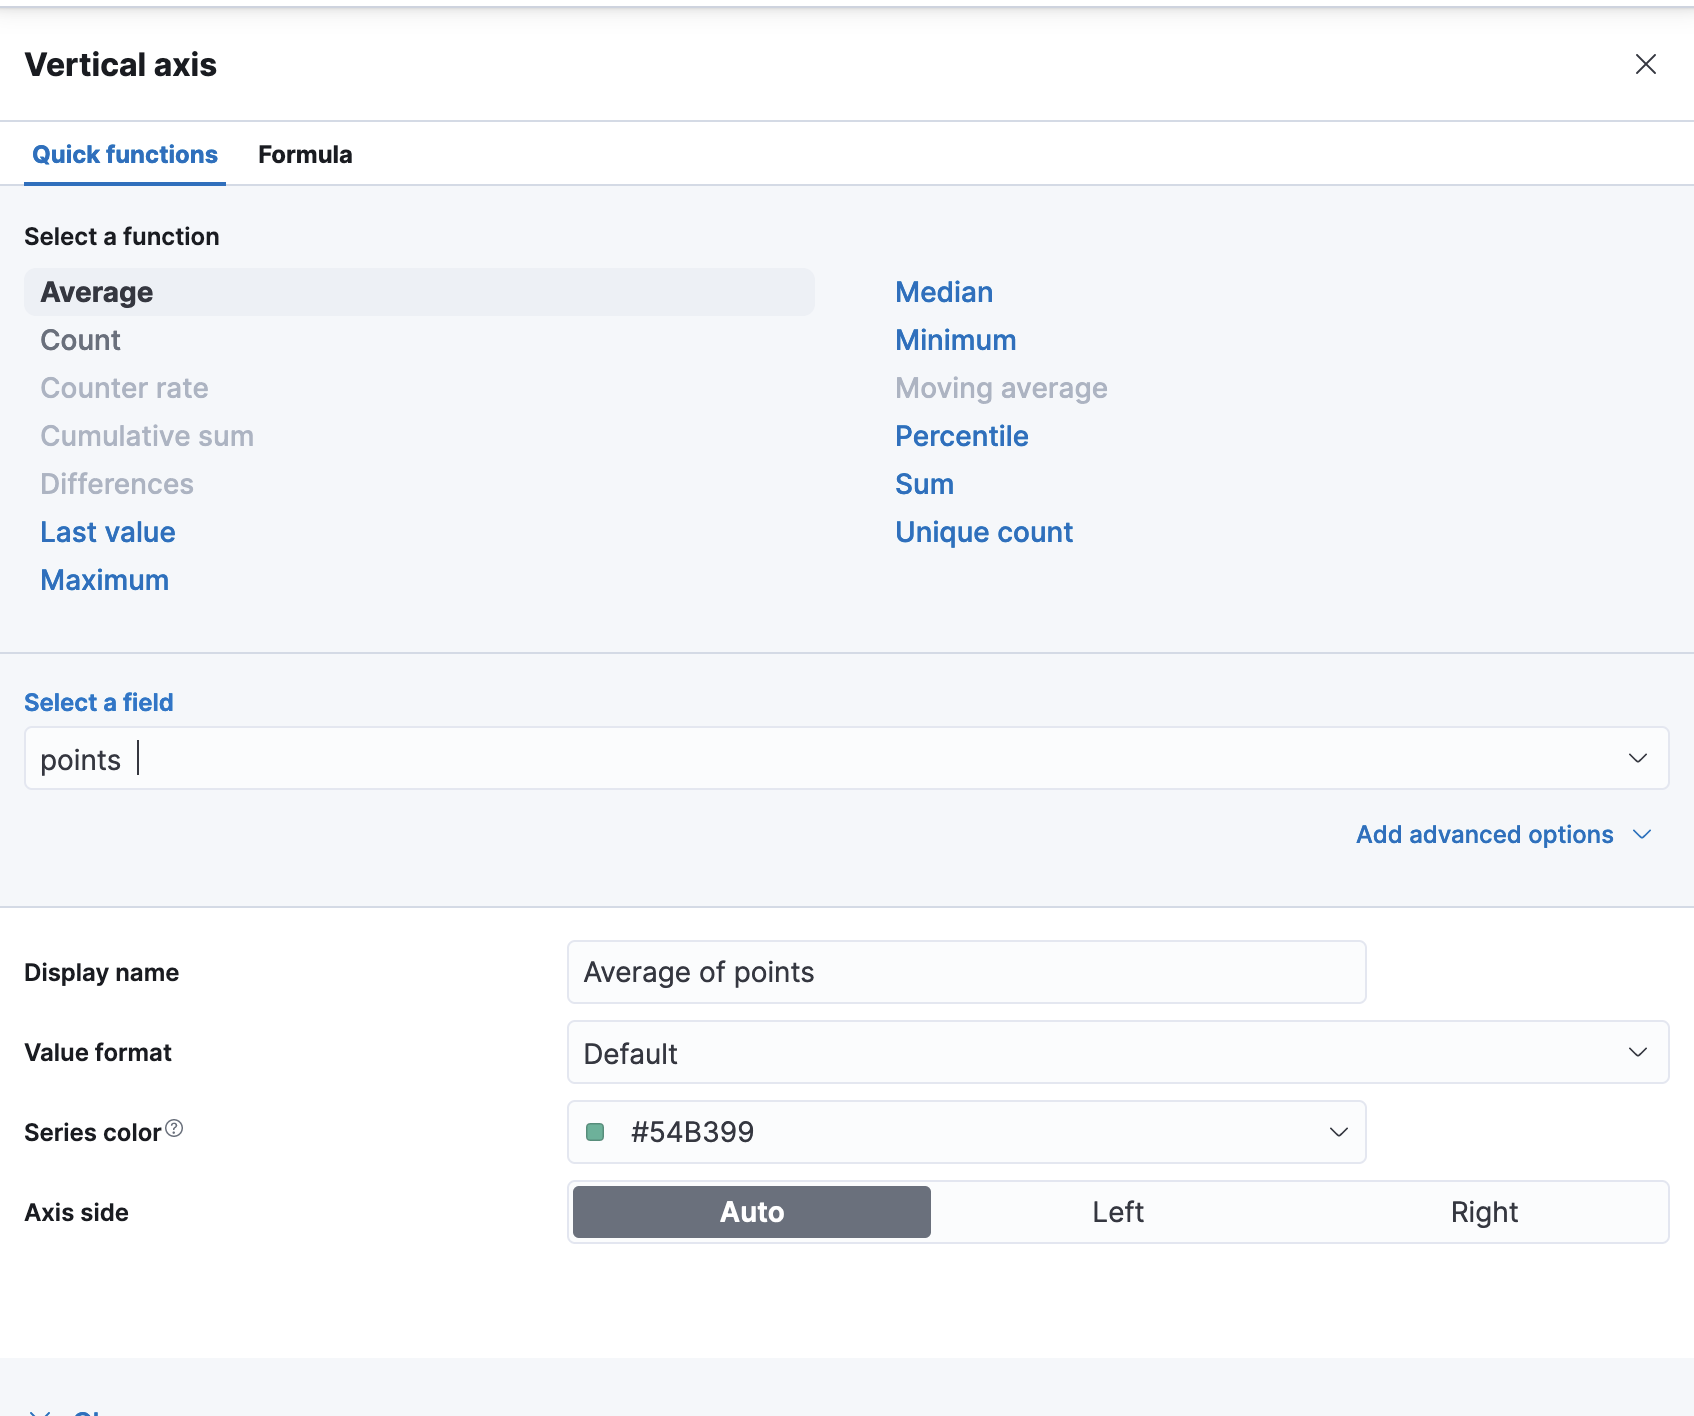
설정이 완료되면 다음과 같이 바 차트로 결과를 확인할 수 있다.
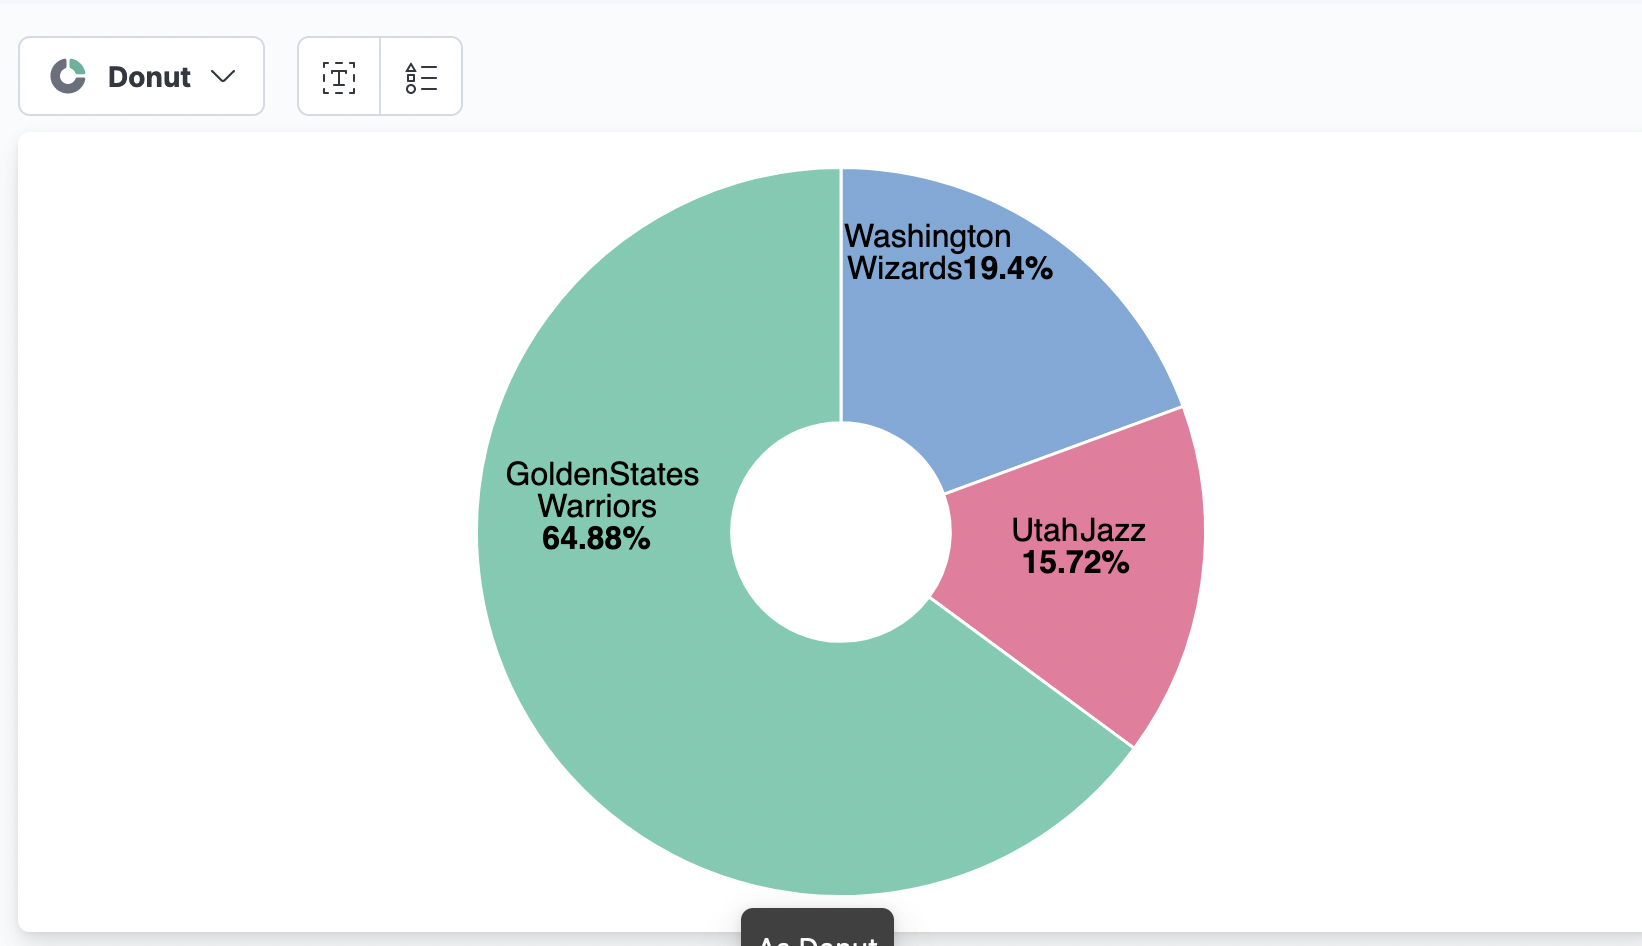
Donut
이번엔 Donut으로 결과를 확인해보자. 아까와 같이 선택하고 이번엔 bar가 아닌 Donut을 선택해준다.
선수들 총점을 이용한 결과를 확인하기 위해 x축과 y축은 다음과 같이 설정해준다.
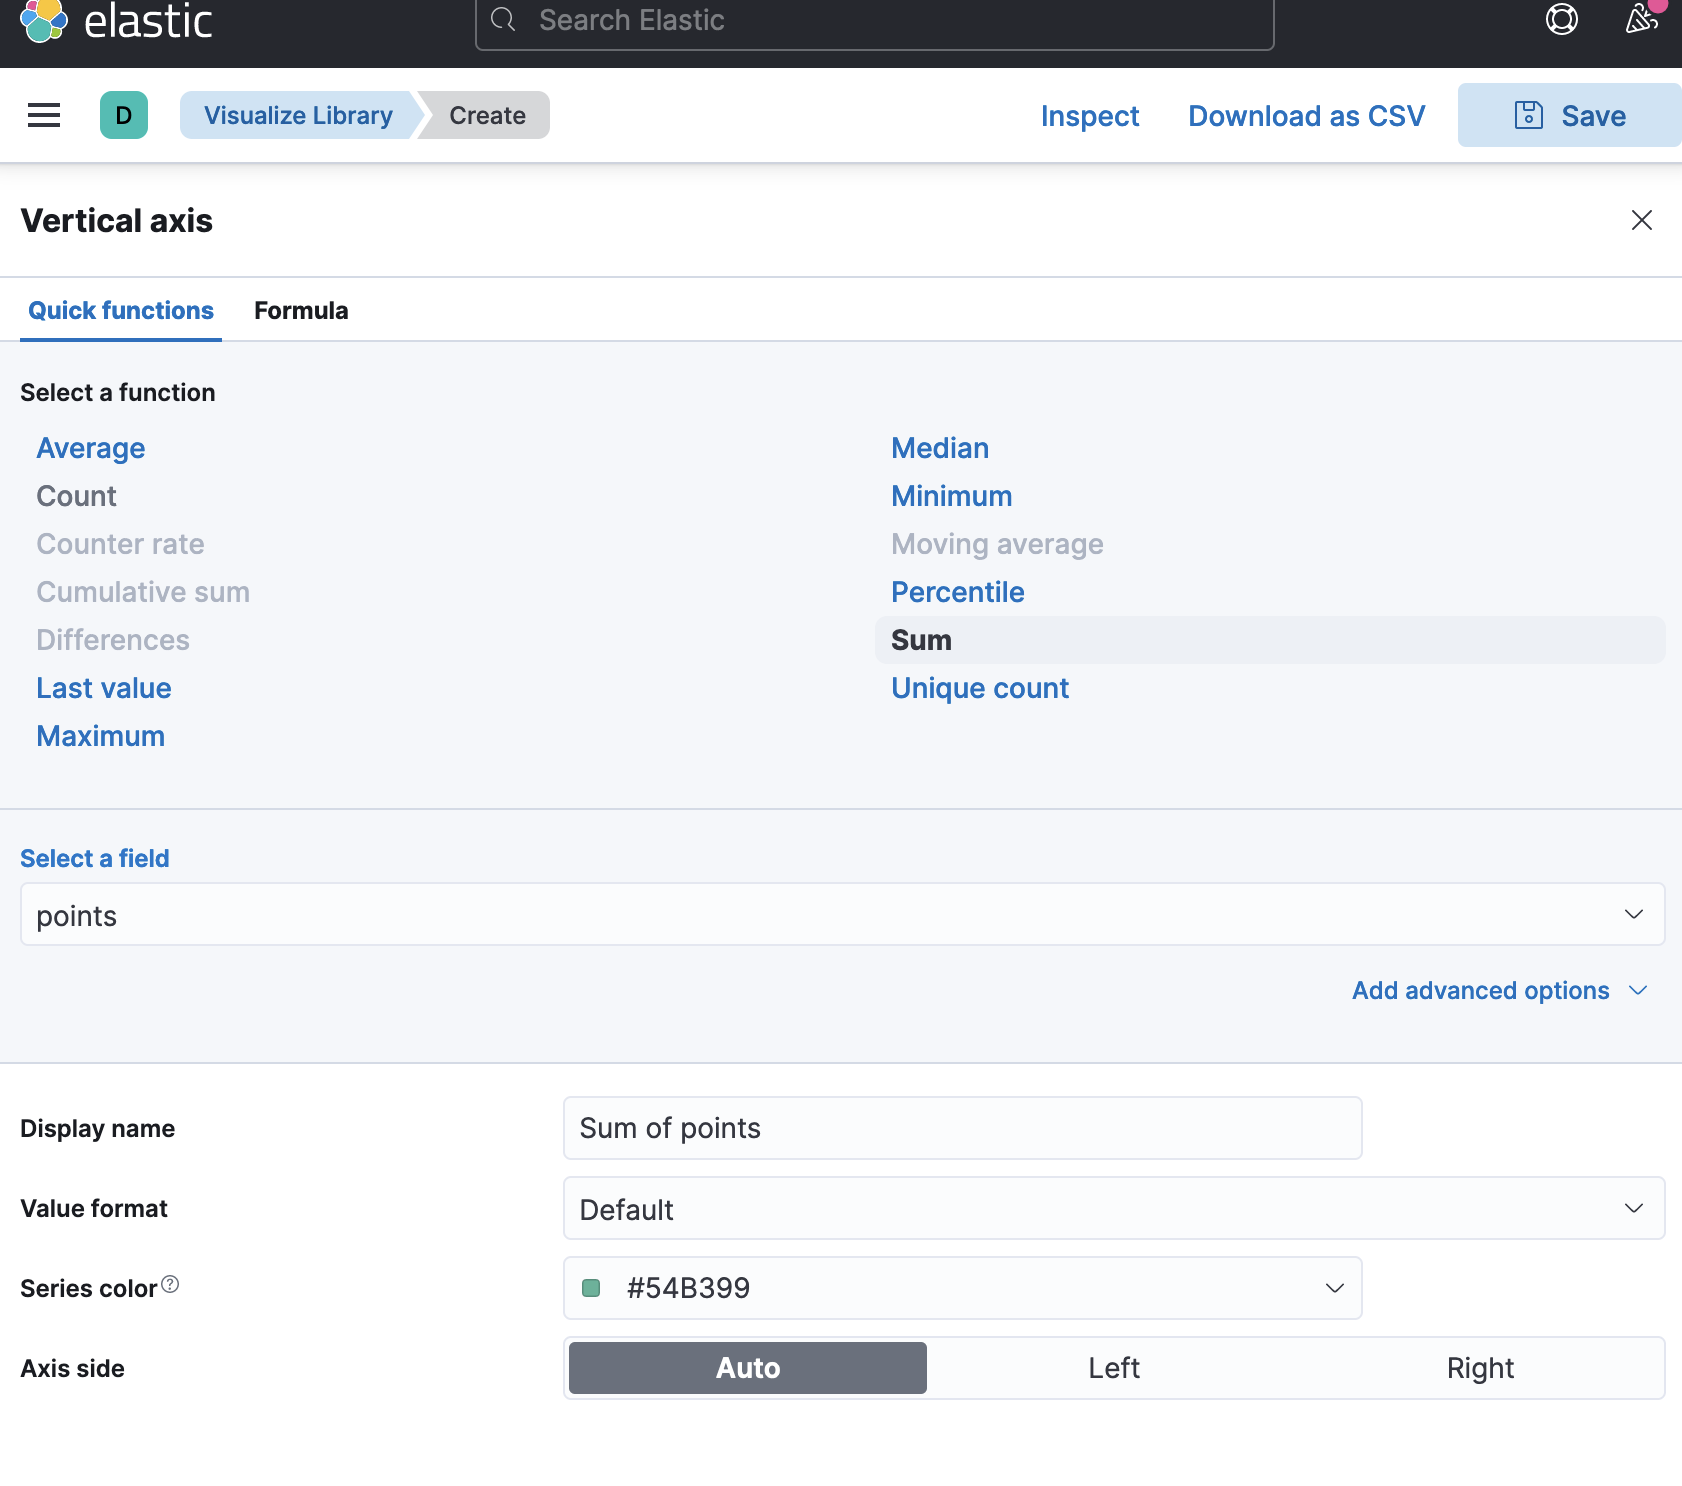
설정이 완료되면 다음과 같이 결과를 확인할 수 있다.
Map
이번엔 Map을 이용하여 지도상의 표로 데이터를 확인하도록 하자.
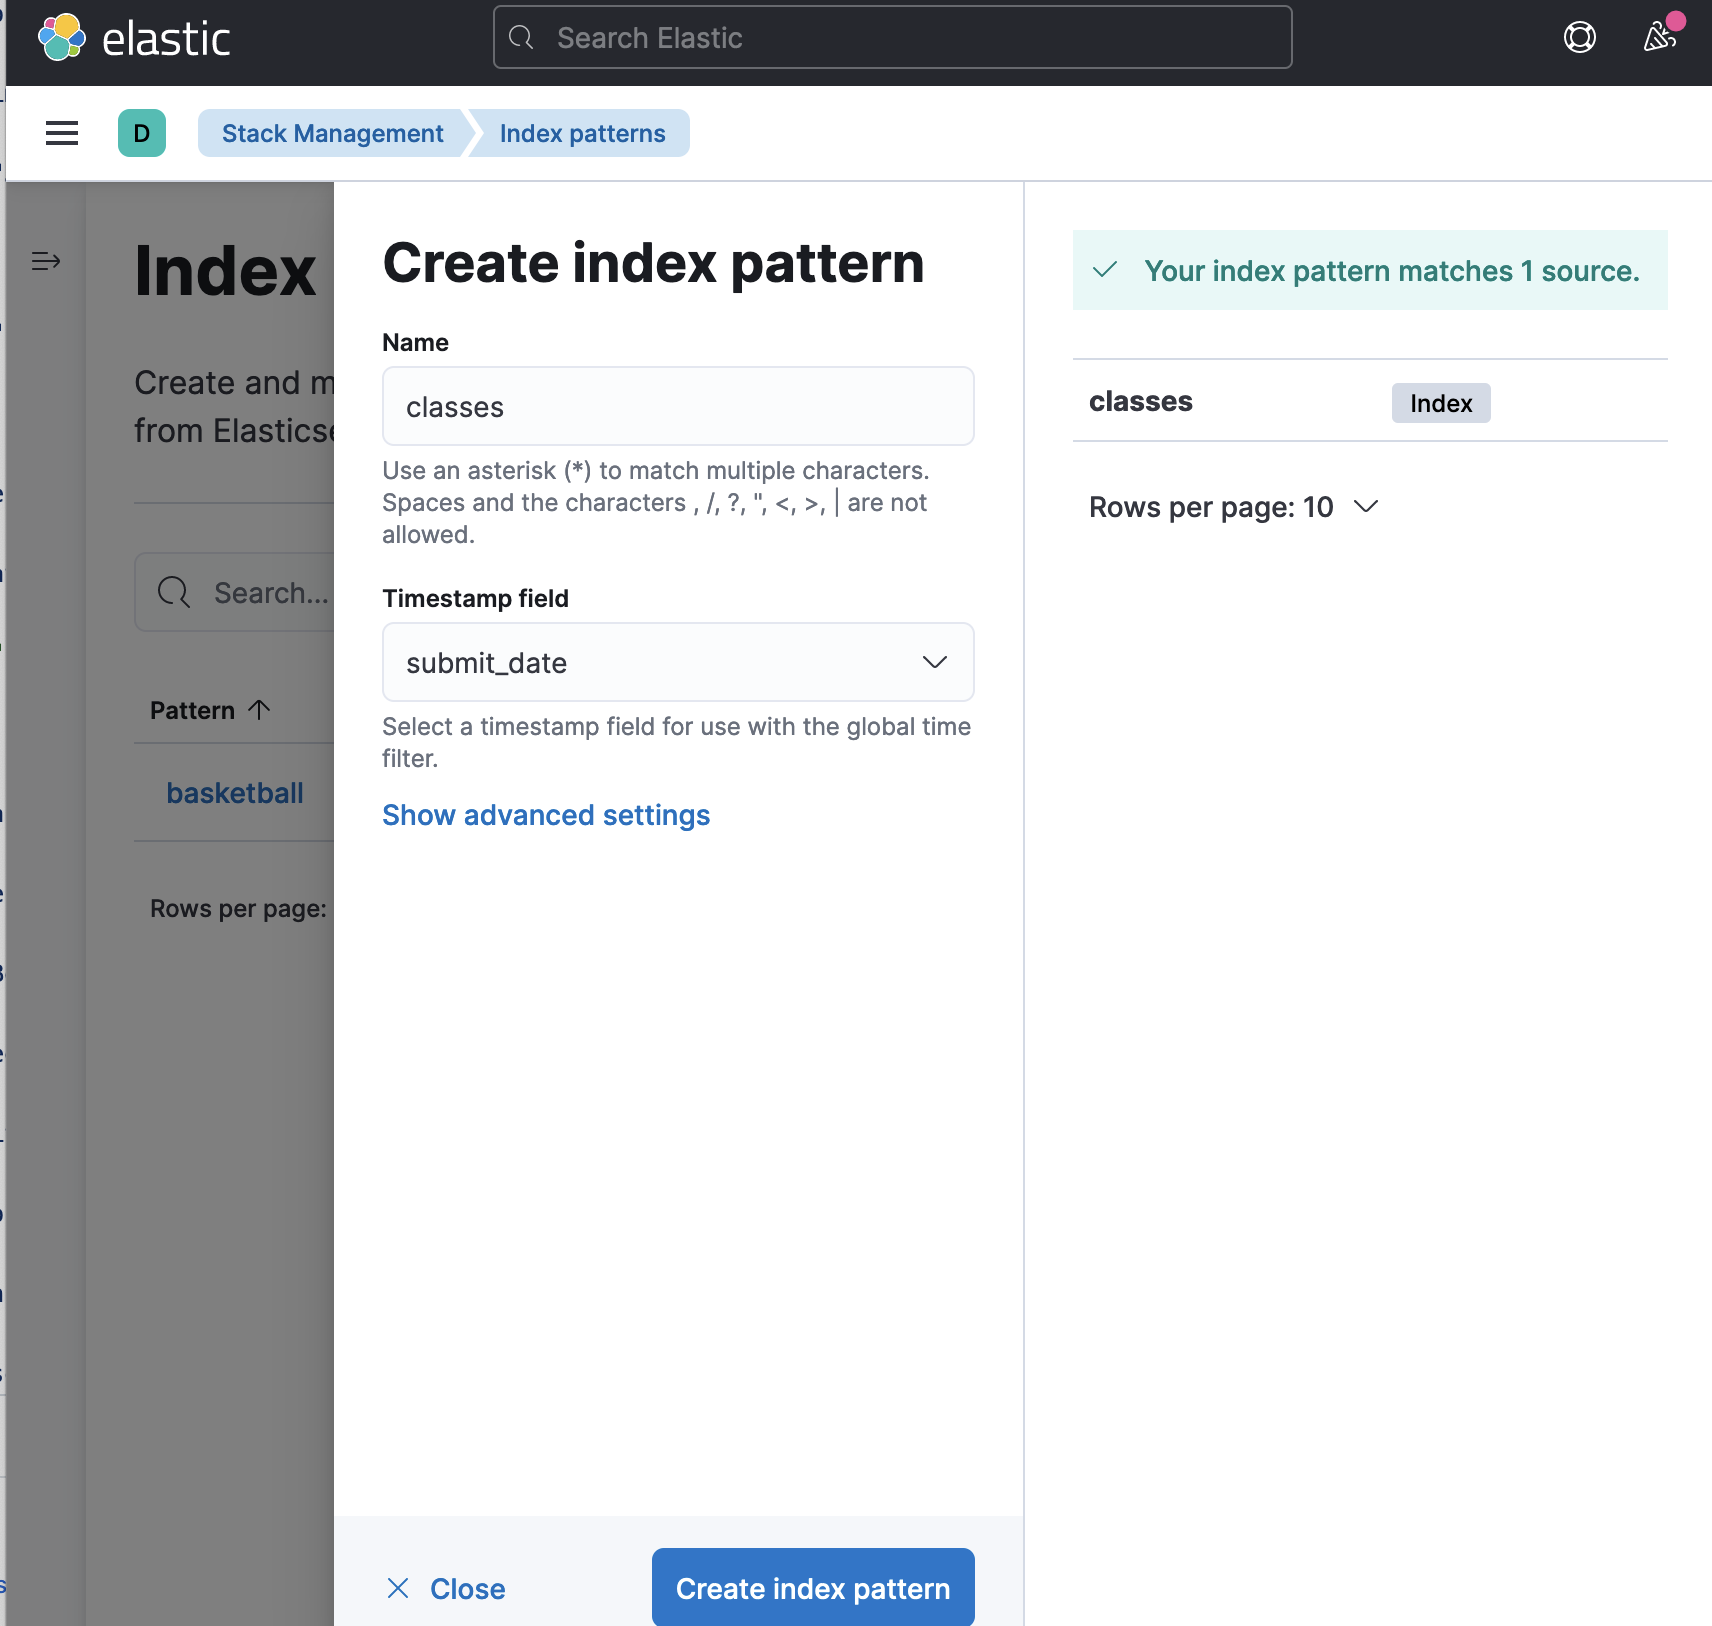
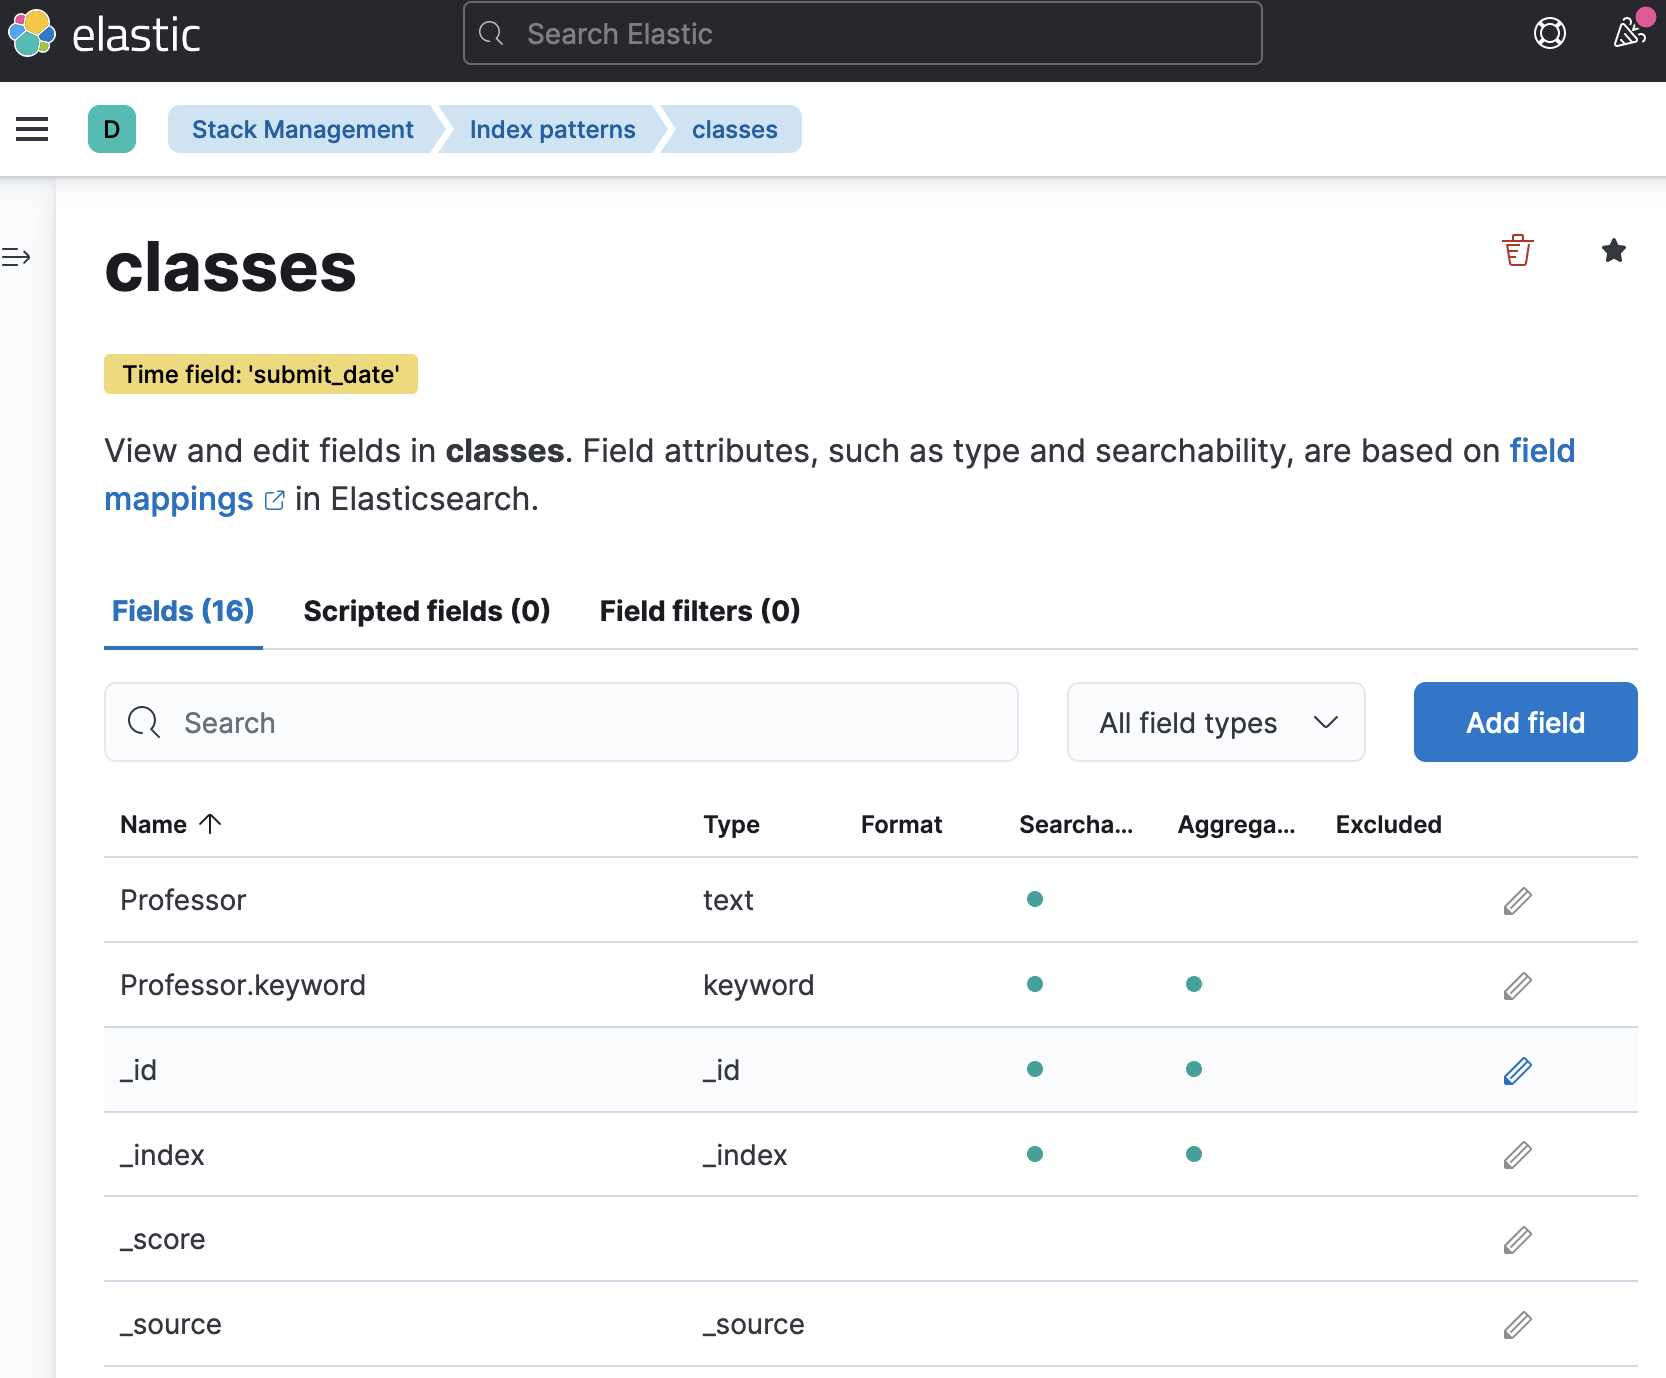
먼저 다음과 같이 인덱스를 생성해준다. 여기서 매핑이 완료 되어야 지도에서 표시될 수 있는 데이터임을 알 수 있다.
% curl -X POST 'http://localhost:9200/_bulk?pretty'  -H 'Content-Type: application/json' --data-binary @classes.json
{
  "took" : 110,
  "errors" : false,
  "items" : [
    {
      "index" : {
        "_index" : "classes",
        "_type" : "class",
        "_id" : "1",
        "_version" : 2,
        "result" : "updated",
        "_shards" : {
          "total" : 2,
          "successful" : 1,
          "failed" : 0
        },
        "_seq_no" : 24,
        "_primary_term" : 2,
        "status" : 200
      }
    },
    {
      "index" : {
        "_index" : "classes",
        "_type" : "class",
        "_id" : "2",
        "_version" : 2,
        "result" : "updated",
        "_shards" : {
          "total" : 2,
          "successful" : 1,
          "failed" : 0
        },
        "_seq_no" : 25,
        "_primary_term" : 2,
        "status" : 200
      }
    },
    {
      "index" : {
        "_index" : "classes",
        "_type" : "class",
        "_id" : "3",
        "_version" : 2,
        "result" : "updated",
        "_shards" : {
          "total" : 2,
          "successful" : 1,
          "failed" : 0
        },
        "_seq_no" : 26,
        "_primary_term" : 2,
        "status" : 200
      }
    },
    {
      "index" : {
        "_index" : "classes",
        "_type" : "class",
        "_id" : "5",
        "_version" : 2,
        "result" : "updated",
        "_shards" : {
          "total" : 2,
          "successful" : 1,
          "failed" : 0
        },
        "_seq_no" : 27,
        "_primary_term" : 2,
        "status" : 200
      }
    },
    {
      "index" : {
        "_index" : "classes",
        "_type" : "class",
        "_id" : "6",
        "_version" : 2,
        "result" : "updated",
        "_shards" : {
          "total" : 2,
          "successful" : 1,
          "failed" : 0
        },
        "_seq_no" : 28,
        "_primary_term" : 2,
        "status" : 200
      }
    },
    {
      "index" : {
        "_index" : "classes",
        "_type" : "class",
        "_id" : "7",
        "_version" : 2,
        "result" : "updated",
        "_shards" : {
          "total" : 2,
          "successful" : 1,
          "failed" : 0
        },
        "_seq_no" : 29,
        "_primary_term" : 2,
        "status" : 200
      }
    },
    {
      "index" : {
        "_index" : "classes",
        "_type" : "class",
        "_id" : "8",
        "_version" : 2,
        "result" : "updated",
        "_shards" : {
          "total" : 2,
          "successful" : 1,
          "failed" : 0
        },
        "_seq_no" : 30,
        "_primary_term" : 2,
        "status" : 200
      }
    },
    {
      "index" : {
        "_index" : "classes",
        "_type" : "class",
        "_id" : "9",
        "_version" : 2,
        "result" : "updated",
        "_shards" : {
          "total" : 2,
          "successful" : 1,
          "failed" : 0
        },
        "_seq_no" : 31,
        "_primary_term" : 2,
        "status" : 200
      }
    },
    {
      "index" : {
        "_index" : "classes",
        "_type" : "class",
        "_id" : "10",
        "_version" : 2,
        "result" : "updated",
        "_shards" : {
          "total" : 2,
          "successful" : 1,
          "failed" : 0
        },
        "_seq_no" : 32,
        "_primary_term" : 2,
        "status" : 200
      }
    },
    {
      "index" : {
        "_index" : "classes",
        "_type" : "class",
        "_id" : "11",
        "_version" : 2,
        "result" : "updated",
        "_shards" : {
          "total" : 2,
          "successful" : 1,
          "failed" : 0
        },
        "_seq_no" : 33,
        "_primary_term" : 2,
        "status" : 200
      }
    },
    {
      "index" : {
        "_index" : "classes",
        "_type" : "class",
        "_id" : "12",
        "_version" : 2,
        "result" : "updated",
        "_shards" : {
          "total" : 2,
          "successful" : 1,
          "failed" : 0
        },
        "_seq_no" : 34,
        "_primary_term" : 2,
        "status" : 200
      }
    },
    {
      "index" : {
        "_index" : "classes",
        "_type" : "class",
        "_id" : "13",
        "_version" : 2,
        "result" : "updated",
        "_shards" : {
          "total" : 2,
          "successful" : 1,
          "failed" : 0
        },
        "_seq_no" : 35,
        "_primary_term" : 2,
        "status" : 200
      }
    },
    {
      "index" : {
        "_index" : "classes",
        "_type" : "class",
        "_id" : "14",
        "_version" : 2,
        "result" : "updated",
        "_shards" : {
          "total" : 2,
          "successful" : 1,
          "failed" : 0
        },
        "_seq_no" : 36,
        "_primary_term" : 2,
        "status" : 200
      }
    },
    {
      "index" : {
        "_index" : "classes",
        "_type" : "class",
        "_id" : "15",
        "_version" : 2,
        "result" : "updated",
        "_shards" : {
          "total" : 2,
          "successful" : 1,
          "failed" : 0
        },
        "_seq_no" : 37,
        "_primary_term" : 2,
        "status" : 200
      }
    },
    {
      "index" : {
        "_index" : "classes",
        "_type" : "class",
        "_id" : "16",
        "_version" : 2,
        "result" : "updated",
        "_shards" : {
          "total" : 2,
          "successful" : 1,
          "failed" : 0
        },
        "_seq_no" : 38,
        "_primary_term" : 2,
        "status" : 200
      }
    },
    {
      "index" : {
        "_index" : "classes",
        "_type" : "class",
        "_id" : "17",
        "_version" : 2,
        "result" : "updated",
        "_shards" : {
          "total" : 2,
          "successful" : 1,
          "failed" : 0
        },
        "_seq_no" : 39,
        "_primary_term" : 2,
        "status" : 200
      }
    },
    {
      "index" : {
        "_index" : "classes",
        "_type" : "class",
        "_id" : "18",
        "_version" : 2,
        "result" : "updated",
        "_shards" : {
          "total" : 2,
          "successful" : 1,
          "failed" : 0
        },
        "_seq_no" : 40,
        "_primary_term" : 2,
        "status" : 200
      }
    },
    {
      "index" : {
        "_index" : "classes",
        "_type" : "class",
        "_id" : "19",
        "_version" : 2,
        "result" : "updated",
        "_shards" : {
          "total" : 2,
          "successful" : 1,
          "failed" : 0
        },
        "_seq_no" : 41,
        "_primary_term" : 2,
        "status" : 200
      }
    },
    {
      "index" : {
        "_index" : "classes",
        "_type" : "class",
        "_id" : "20",
        "_version" : 2,
        "result" : "updated",
        "_shards" : {
          "total" : 2,
          "successful" : 1,
          "failed" : 0
        },
        "_seq_no" : 42,
        "_primary_term" : 2,
        "status" : 200
      }
    },
    {
      "index" : {
        "_index" : "classes",
        "_type" : "class",
        "_id" : "21",
        "_version" : 2,
        "result" : "updated",
        "_shards" : {
          "total" : 2,
          "successful" : 1,
          "failed" : 0
        },
        "_seq_no" : 43,
        "_primary_term" : 2,
        "status" : 200
      }
    },
    {
      "index" : {
        "_index" : "classes",
        "_type" : "class",
        "_id" : "22",
        "_version" : 2,
        "result" : "updated",
        "_shards" : {
          "total" : 2,
          "successful" : 1,
          "failed" : 0
        },
        "_seq_no" : 44,
        "_primary_term" : 2,
        "status" : 200
      }
    },
    {
      "index" : {
        "_index" : "classes",
        "_type" : "class",
        "_id" : "23",
        "_version" : 2,
        "result" : "updated",
        "_shards" : {
          "total" : 2,
          "successful" : 1,
          "failed" : 0
        },
        "_seq_no" : 45,
        "_primary_term" : 2,
        "status" : 200
      }
    },
    {
      "index" : {
        "_index" : "classes",
        "_type" : "class",
        "_id" : "24",
        "_version" : 2,
        "result" : "updated",
        "_shards" : {
          "total" : 2,
          "successful" : 1,
          "failed" : 0
        },
        "_seq_no" : 46,
        "_primary_term" : 2,
        "status" : 200
      }
    },
    {
      "index" : {
        "_index" : "classes",
        "_type" : "class",
        "_id" : "25",
        "_version" : 2,
        "result" : "updated",
        "_shards" : {
          "total" : 2,
          "successful" : 1,
          "failed" : 0
        },
        "_seq_no" : 47,
        "_primary_term" : 2,
        "status" : 200
      }
    }
  ]
}

% curl -XPUT 'http://localhost:9200/classes/class/_mapping?include_type_name=true&pretty' -H 'Content-Type:application/json' -d @classesRating_mapping.json
{
  "acknowledged" : true
}

% curl -XGET 'http://localhost:9200/classes/class/1?pretty'
{
  "_index" : "classes",
  "_type" : "class",
  "_id" : "1",
  "_version" : 2,
  "_seq_no" : 24,
  "_primary_term" : 2,
  "found" : true,
  "_source" : {
    "title" : "Machine Learning",
    "Professor" : "Minsuk Heo",
    "major" : "Computer Science",
    "semester" : [
      "spring",
      "fall"
    ],
    "student_count" : 100,
    "unit" : 3,
    "rating" : 5,
    "submit_date" : "2016-01-02",
    "school_location" : {
      "lat" : 36.0,
      "lon" : -120.0
    }
  }
}
생성한 인덱스를 위에서 했던 것과 같이 Index patterns를 이용해 Kibana에 가져온다.
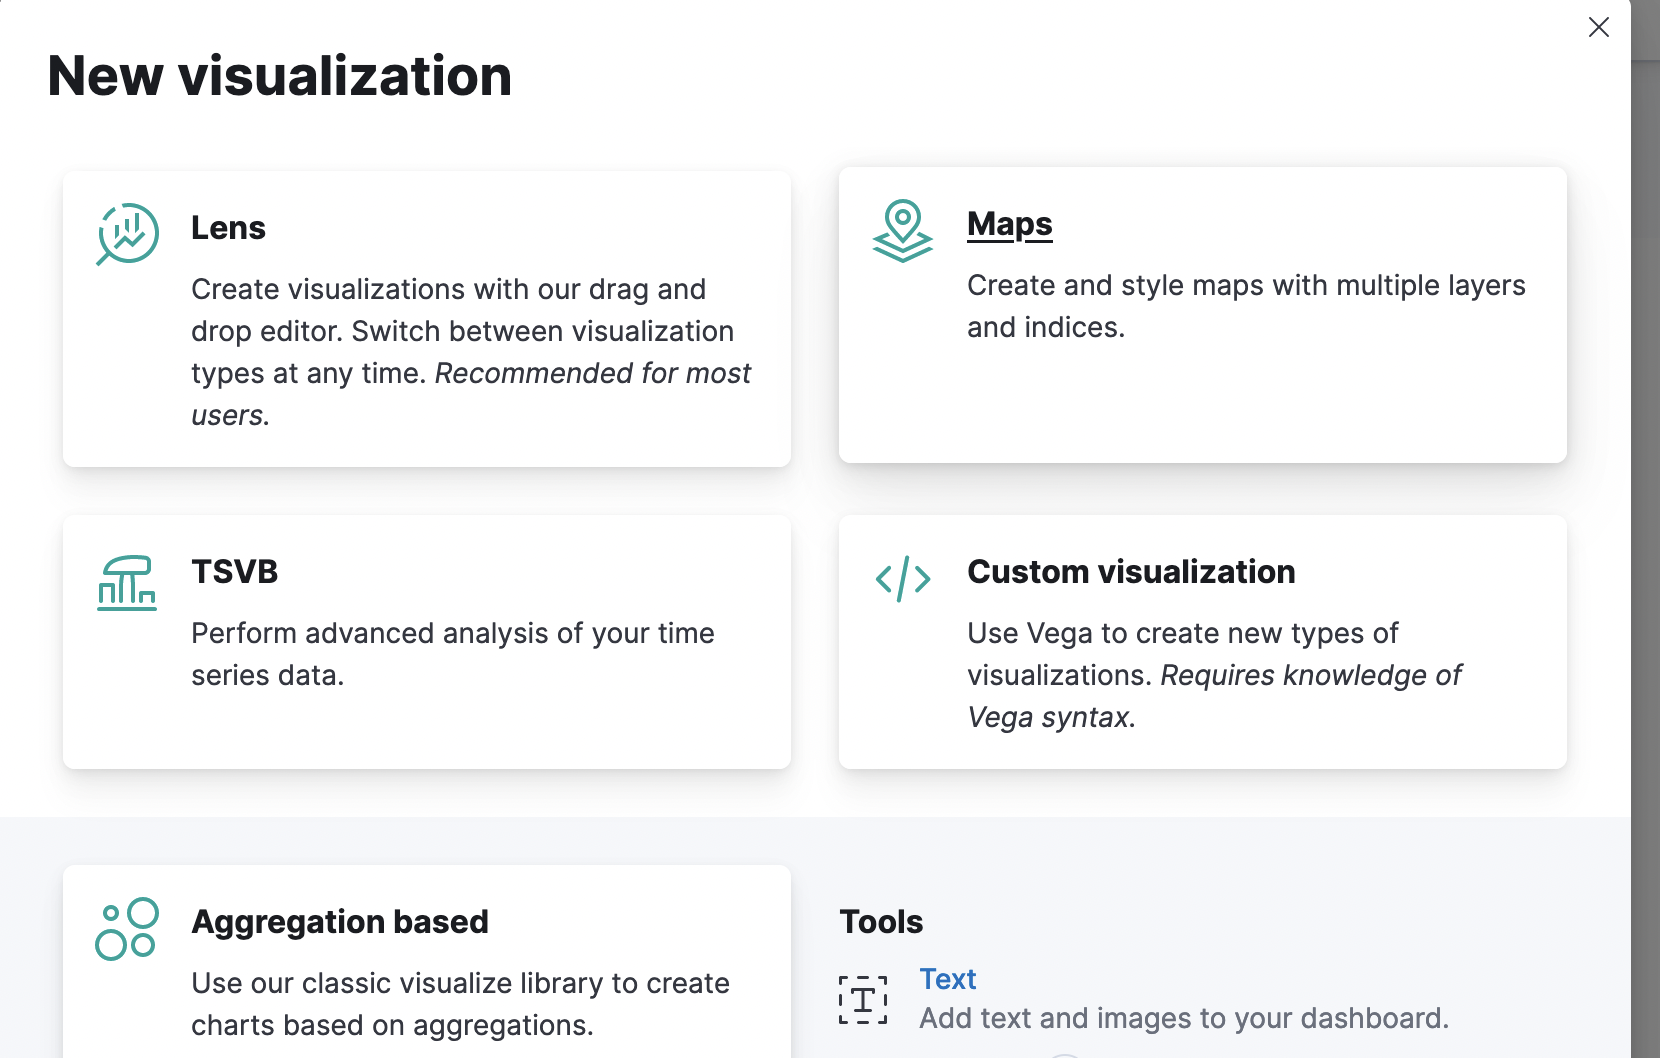
이번엔 Visualization에서 Lens가 아닌 Maps를 선택해준다.
좌측 바의 Visualize Library -> create new visualization -> Maps -> Add Layer -> Documents
그

여기서 아까 생성한 인덱스와 지도 표시 필드를 선택해준다.
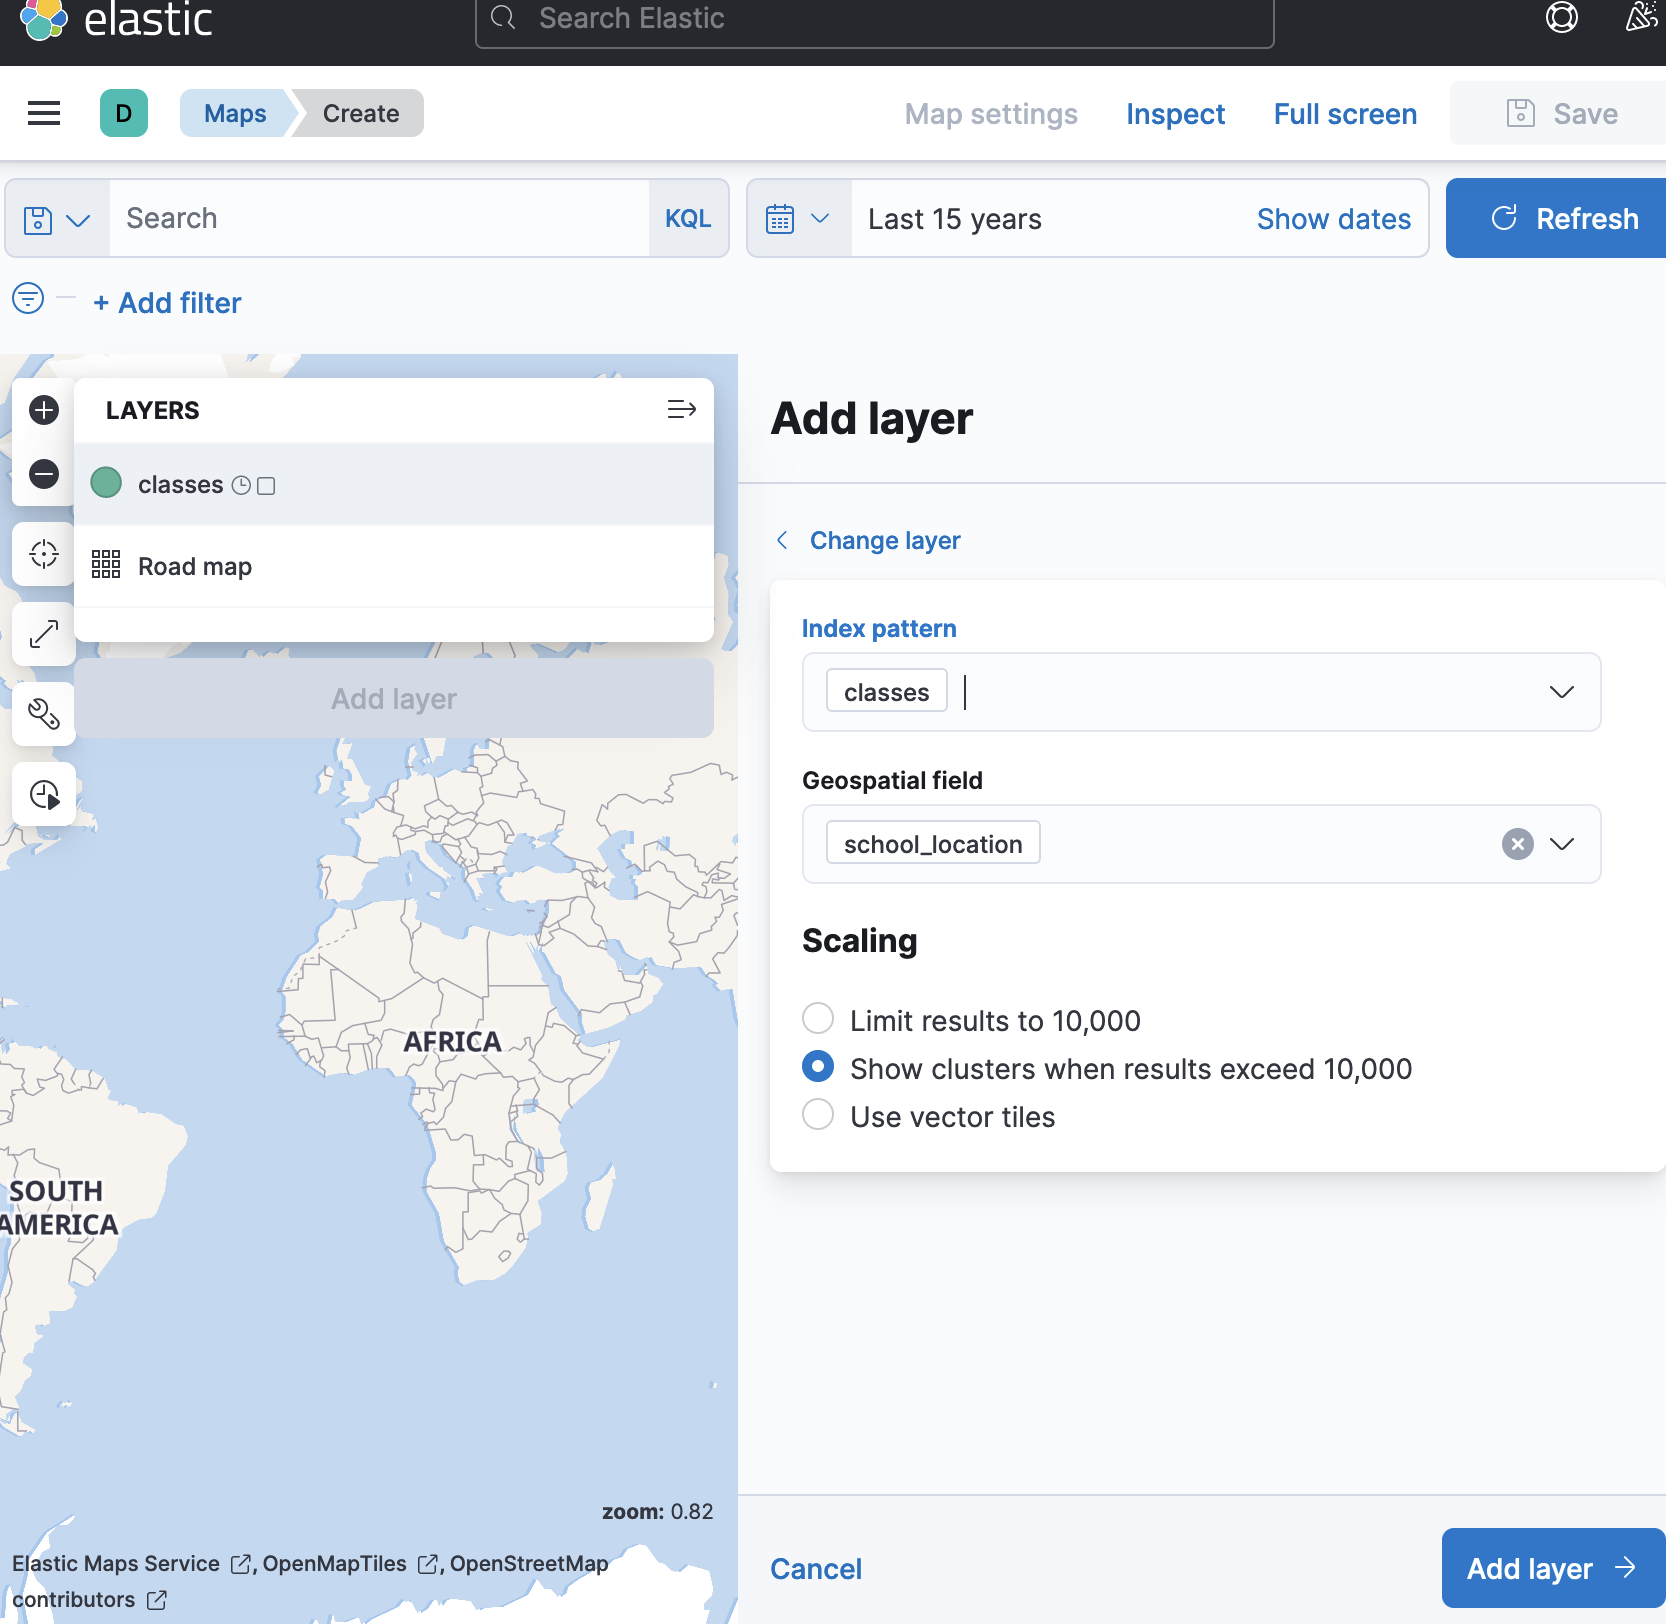
기간을 올바르게 설정하면 다음과 같이 지도 표시 데이터를 확인할 수 있다.

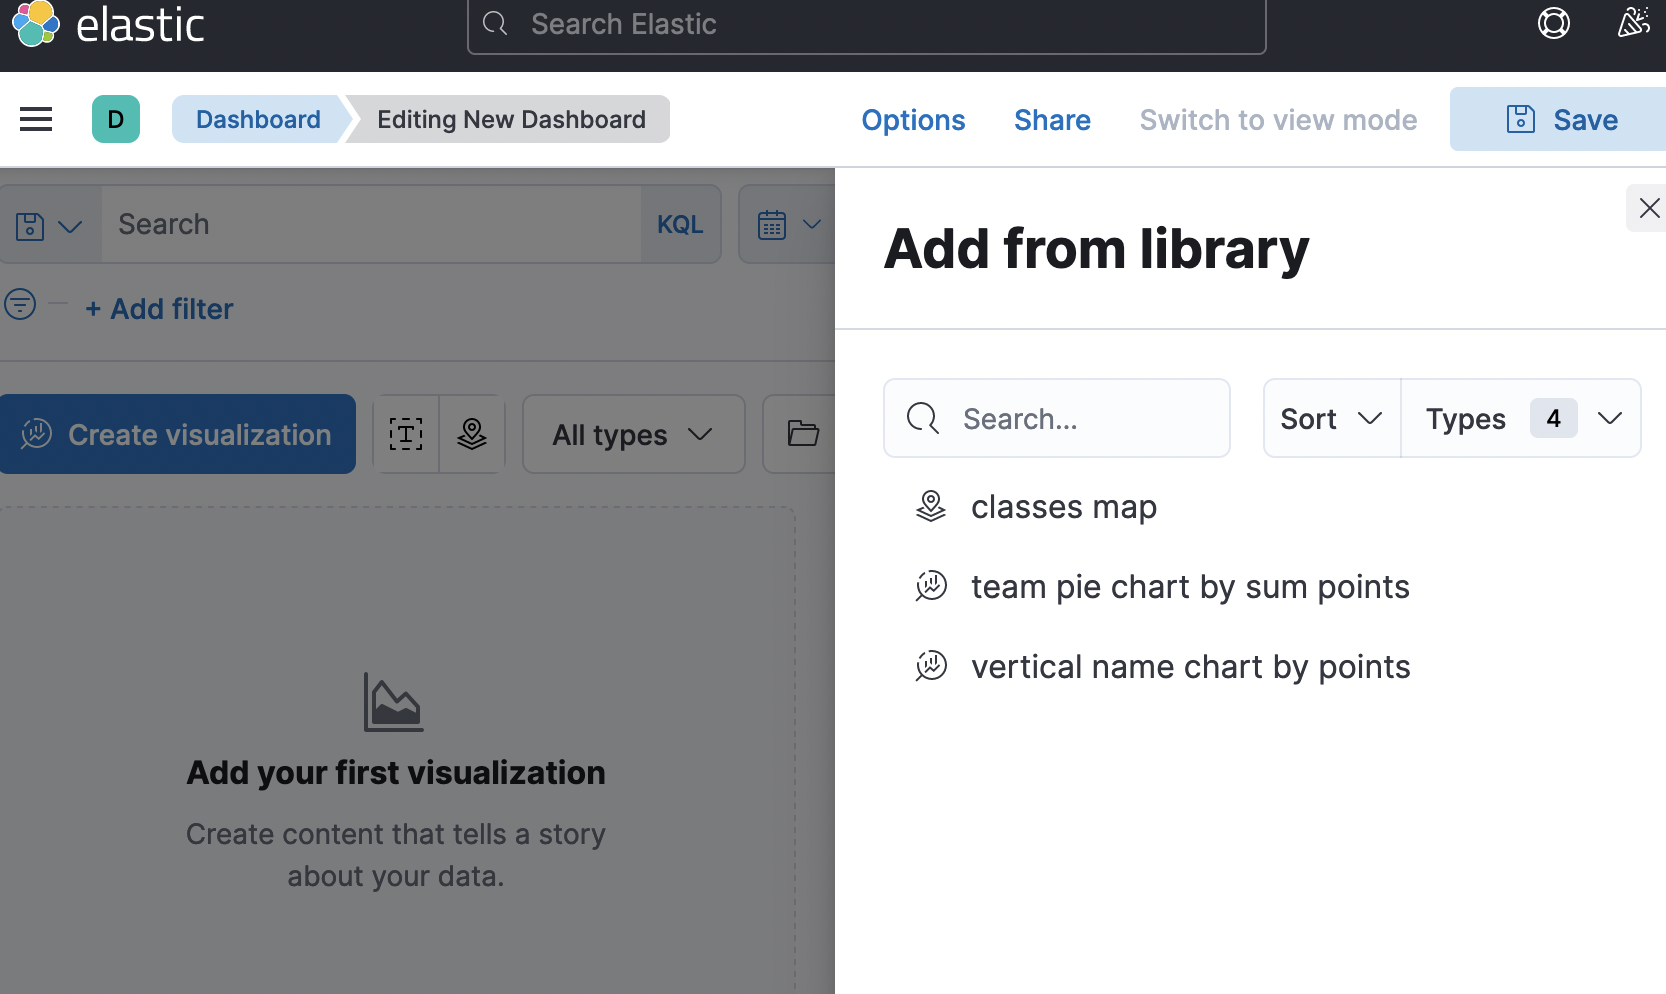
Dashboard
이번엔 대시보드를 이용해서 앞서 보았던 표들을 한번에 모아서 볼 수 있도록 설정해보자.
이전에 만든 visualization들에 대해서 모두 save가 된 상태이거나 이 단계에서 visualization을 생성하는 방법으로 진행할 수 있다.
나는 이전에 만들어둔 표들을 모두 save로 저장해놓고 진행하였다.
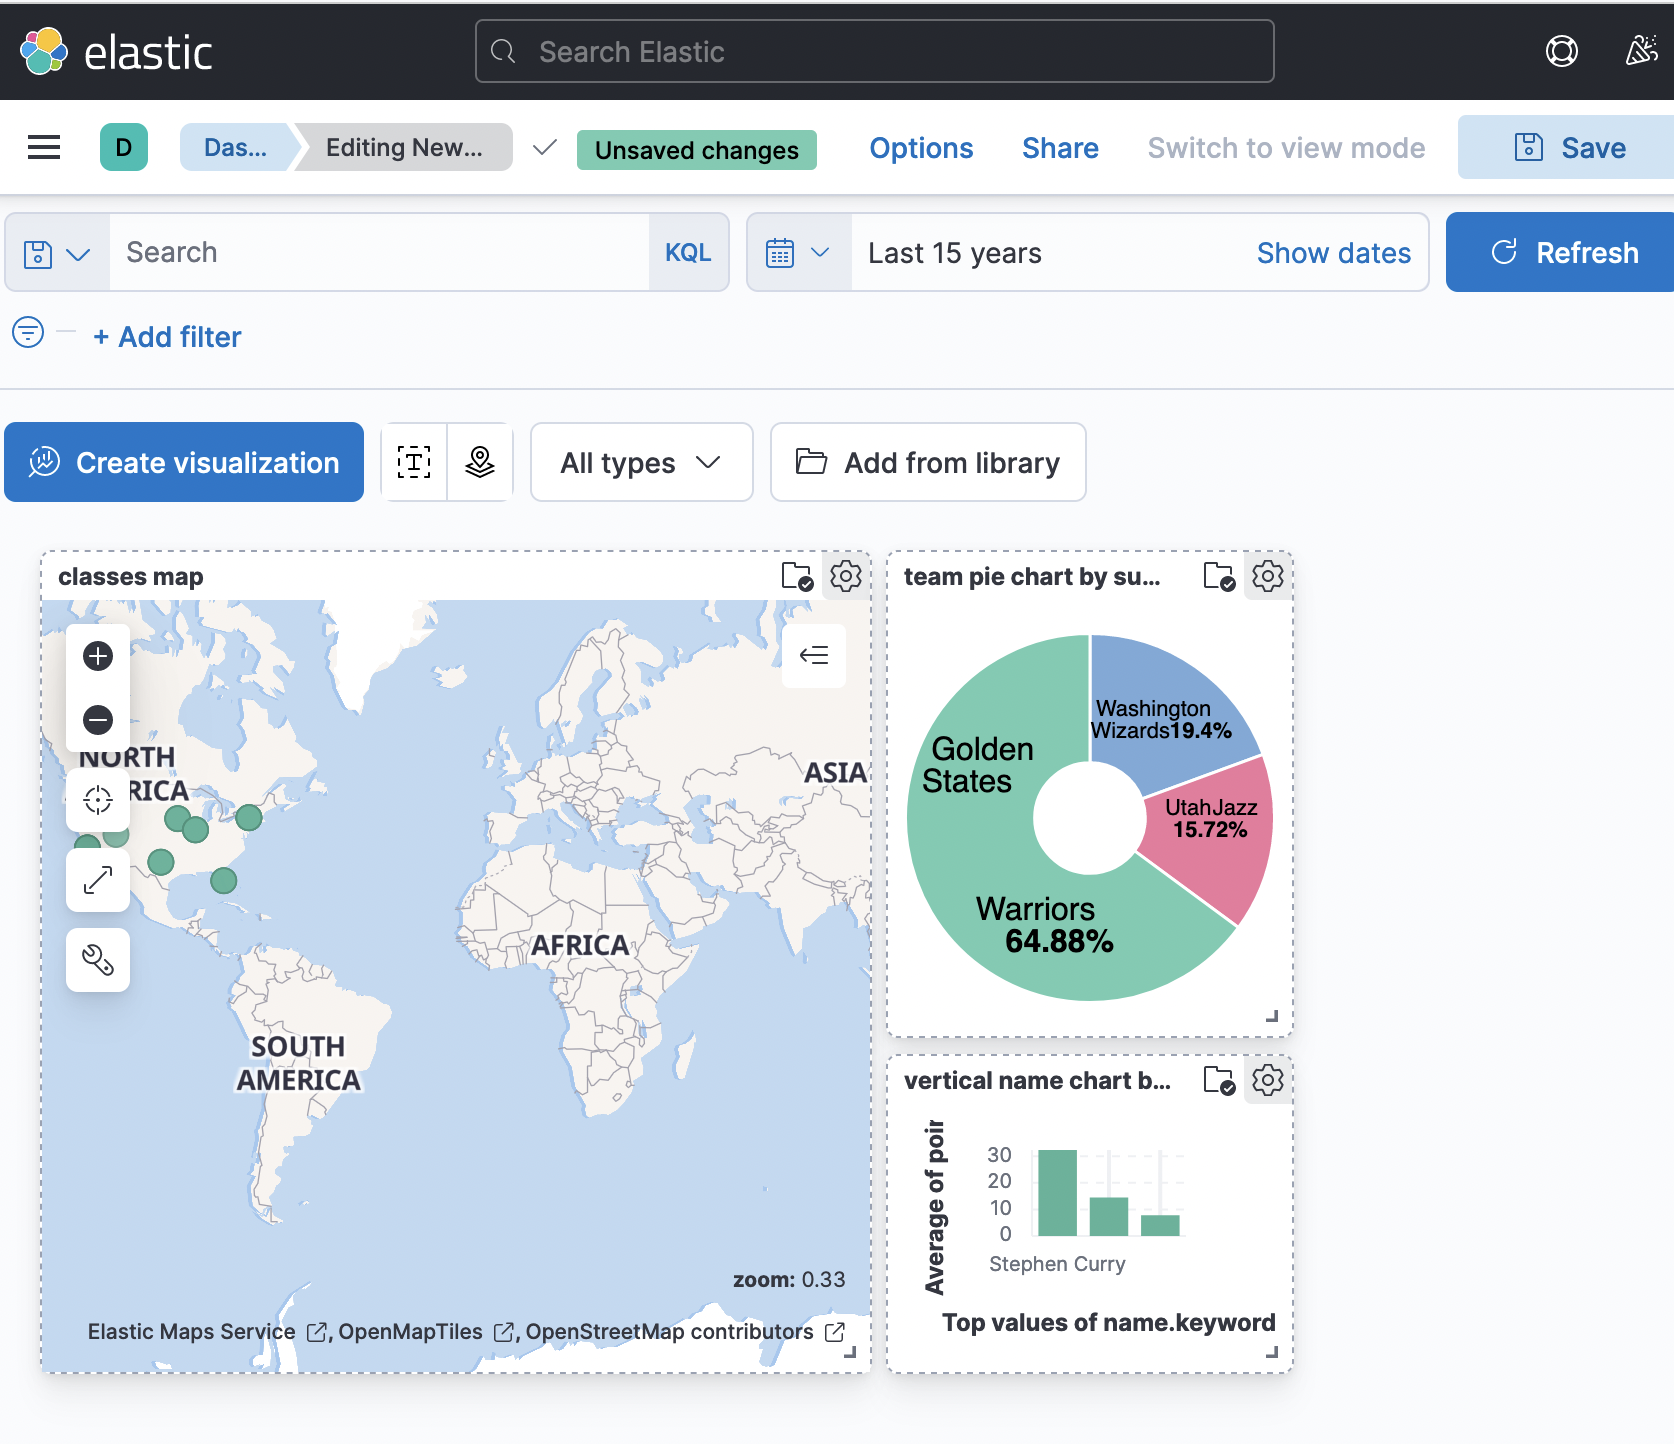
좌측 Dashboard -> create new dashboard -> Add from libarary -> 표시하고자 하는 데이터 선택


데이터를 추가하고 나면 다음과 같이 시각화된 대시보드를 확인할 수 있다.
( 참고한 사이트 ✨)
https://kim-dragon.tistory.com/20
ELK(ElasticSearch, Logstash, Kibana) 란? ELK Stack 이란?
ELK란? ELK는 3가지 오픈소스 소프트웨어 Elastic Search, LogStatsh, Kibana의 조합을 말합니다. 각 제품이 연동되어 데이터 수집 및 분석 툴로서 동작합니다. Elastic이라는 기업명에 걸맞게 높은 확장성과
kim-dragon.tistory.com
'데이터베이스' 카테고리의 다른 글
ELK스택 기본사용법 - ③ Logstash + 실제 데이터 활용해보기 (1) 2022.10.31 ELK스택 기본사용법 - ① ElasticSearch (0) 2022.10.26 동시성 제어 (0) 2022.08.18 조회 성능 개선하기 ( ③ DB 최적화, Replication ) (0) 2022.04.28 조회 성능 개선하기 ( ② 인덱스 설계 ) (0) 2022.04.28