-
Youtube 만들기 - 4) 비디오 업로드 Form 만들기 3(썸네일 만들기)NODE.JS 2021. 5. 14. 10:10
파일을 업로드 하면 옆에 썸네일이 생성되도록 지정할 것이다.
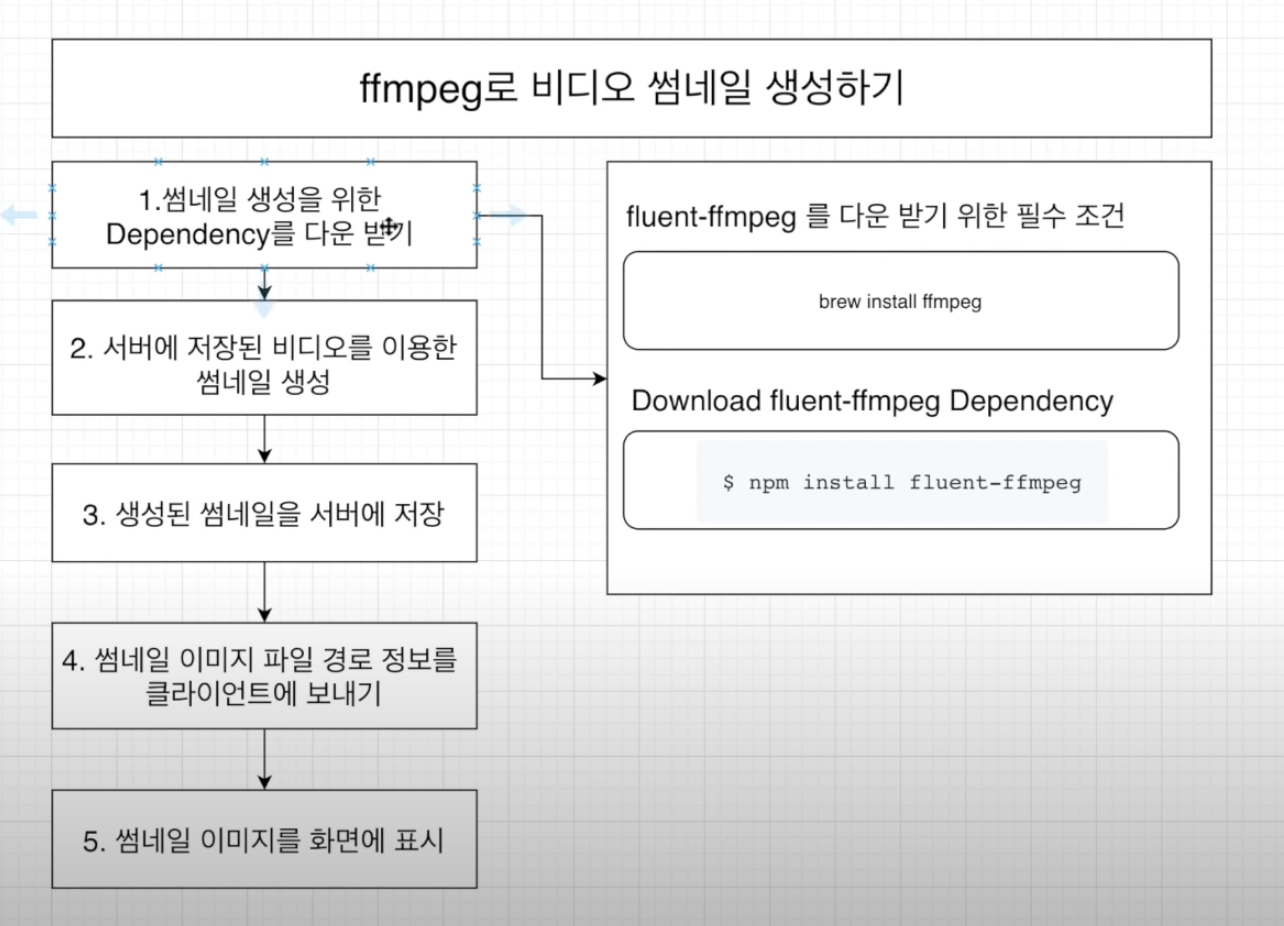
순서 썸네일을 생성하기 위해서는 ffmpeg를 사용한다.
brew install ffmpeg를 해주고,
그 후 npm install fluent-ffmpeg --save를 해준다.
썸네일 생성을 위해 저번시간에 생성한 onDrop함수에 다음과 같은 axios구문을 추가해준다.
    const onDrop = (files) =>{
        //axios를 통해서 데이터 보낼때 파일이 오류생기지 않도록 전환하는 head 사용한다.
        let formData = new FormData;
        const config = {
            header: {'content-type': 'multipart/form-data'}
        }
        formData.append("file", files[0])//첫번째 파일을 가져오기 위해서 배열을 사용한다.

        //서버에 보낸다.
        Axios.post('/api/video/uploadfiles', formData, config)
        .then(response=>{
            if(response.data.success){
                console.log(response.data)

                let variable = {
                    url:response.data.url,
                    fileName : response.data.fileName
                }

                setFilePath(response.data.url)

                Axios.post('/api/video/thumbnail', variable)
                .then(response =>{
                   if (response.data.success){


                }else{
                    alert('썸네일 실행에 실패했습니다. ')
                }
                })

            }else{
                alert('비디오 업로드를 실패했습니다.')
            }
        })
    }
axios를 작성했으니 다시 video.js 파일로 가서 라우트를 작성해주자.
const ffmpeg = require("fluent-ffmpeg");//썸네일 가져오기 위해서 ffmpeg사용한다


//thumbnail 만들기
router.post('/thumbnail', (req, res)=>{

    let filePath = ""
    let fileDuration = ""

    //비디오 러닝타임 가져오기(비디오정보)
    ffmpeg.ffprobe(req.body.url, function(err, metadata){
        console.dir(metadata);
        console.log(metadata.format.duration)
        fileDuration = metadata.format.duration

    });

    //썸네일 생성(비디오 저장경로를 넣으면 이 파일의 파일이름을 생성하고 그 다음에 무엇을 할 지 설정해준다.)
    ffmpeg(req.body.url)//클라이언트 한테서 온 비디오 url
    .on('filenames', function(filenames){//썸네일 파일 이름 생성
        console.log('Will generate ' + filenames.join(', '))
        console.log(filenames)

        filePath = "uploads/thumbnails/"+ filenames[0]
    })
    .on('end',function(){
        console.log('Screenshots taken');//썸네일 생성되면 뭐 할건지
        return res.json({success: true, url:filePath, fileDuration:fileDuration});//러닝타임도 준다.
    })
    .on('error', function (err) {
        console.error(err);
        return res.json({success:false, err});
    })
    .screenshots({
        count:3,//3개의 샷 찍기 가능
        folder: 'uploads/thumbnails',//업로드 폴더안에 썸네일 저장될 것이다.
        size: '320x240',//썸네일 사이즈
        filename:'thumbnail-%b.png'
    })

})

module.exports = router;
업로드 폴더안의 썸네일이라는 폴더에 스크린샷이 생성되므로 폴더를 생성해준다.

다시 client로 돌아와서 다음 부분을 작성해준다.
우리는 5000번 포트를 가지고 있기 때문에 다음과 같이 포트를 추가해준다.
const [FilePath, setFilePath] = useState("") const [Duration, setDuration] = useState("") const [ThumbnailePath, setThumbnailePath] = useState("") const onDrop = (files) =>{ //axios를 통해서 데이터 보낼때 파일이 오류생기지 않도록 전환하는 head 사용한다. let formData = new FormData; const config = { header: {'content-type': 'multipart/form-data'} } formData.append("file", files[0])//첫번째 파일을 가져오기 위해서 배열을 사용한다. //서버에 보낸다. Axios.post('/api/video/uploadfiles', formData, config) .then(response=>{ if(response.data.success){ console.log(response.data) let variable = { url:response.data.url, fileName : response.data.fileName } setFilePath(response.data.url) Axios.post('/api/video/thumbnail', variable) .then(response =>{ if (response.data.success){ setDuration(response.data.fileduration) setThumbnailePath(response.data.url) }else{ alert('썸네일 실행에 실패했습니다. ') } }) }else{ alert('비디오 업로드를 실패했습니다.') } }) } {/* Thumbnail (thumbnailPath가 있을 때에만 작동 */} {ThumbnailePath && <div> <img src={`http://localhost:5000/${ThumbnailePath}`} alt="thumbnail"/> </div> }'NODE.JS' 카테고리의 다른 글
Youtube 만들기 - 6) 랜딩페이지에 비디오들 나타내기 (0) 2021.05.14 Youtube 만들기 - 5) 비디오 업로드 Form 만들기 4(비디오 업로드 하기) (0) 2021.05.14 Youtube 만들기 - 3) 비디오 업로드 Form 만들기 2 (0) 2021.05.14 Youtube 만들기 - 2) 비디오 업로드 Form 만들기 1 (0) 2021.05.14 MERN 기본파일 만들기 - 13)Register Page 만들기 (0) 2021.05.13